Function Invoke-Exe{
[CmdletBinding(SupportsShouldProcess=$true)]
param(
[parameter(mandatory=$true,position=0)]
[ValidateNotNullOrEmpty()]
[string]
$Executable,
[parameter(mandatory=$false,position=1)]
[string]
$Arguments
)
if($Arguments -eq "")
{
Write-Verbose "Running $ReturnFromEXE = Start-Process -FilePath $Executable -ArgumentList $Arguments -NoNewWindow -Wait -Passthru"
$ReturnFromEXE = Start-Process -FilePath $Executable -NoNewWindow -Wait -Passthru
}else{
Write-Verbose "Running $ReturnFromEXE = Start-Process -FilePath $Executable -ArgumentList $Arguments -NoNewWindow -Wait -Passthru"
$ReturnFromEXE = Start-Process -FilePath $Executable -ArgumentList $Arguments -NoNewWindow -Wait -Passthru
}
Write-Verbose "Returncode is $($ReturnFromEXE.ExitCode)"
Return $ReturnFromEXE.ExitCode
}
#Setup
$RunningFromFolder = $MyInvocation.MyCommand.Path | Split-Path -Parent
$WsusDBMaintenanceFile = "$RunningFromFolder\WsusDBMaintenance.sql"
#Connect to DB
#For Windows Internal Database, use $WSUSDB = '\\.\pipe\MICROSOFT##WID\tsql\query'
#For SQL Express, use $WSUSDB = '\\.\pipe\MSSQL$SQLEXPRESS\sql\query'
$WSUSDB = '\\.\pipe\MICROSOFT##WID\tsql\query'
if(!(Test-Path $WSUSDB) -eq $true){Write-Warning "Could not access the DB";BREAK}
if(!(Test-Path $WsusDBMaintenanceFile) -eq $true){Write-Warning "Could not access the WsusDBMaintenance.sql, make sure you have downloaed the file from https://gallery.technet.microsoft.com/scriptcenter/6f8cde49-5c52-4abd-9820-f1d270ddea61#content";BREAK}
Write-Output "Running from: $RunningFromFolder"
Write-Output "Using SQL FIle: $WsusDBMaintenanceFile"
Write-Output "Using DB: $WSUSDB"
#Get and Set the WSUS Server target
$WSUSSrv = Get-WsusServer -Name $env:COMPUTERNAME -PortNumber 8530
Write-Output "Working on $($WSUSSrv.name)"
# Choose Languages
$WSUSSrvCFG = $WSUSSrv.GetConfiguration()
# Synchronization
$WSUSSrvSubScrip = $WSUSSrv.GetSubscription()
$WSUSSrvSubScrip.StartSynchronization()
While($WSUSSrvSubScrip.GetSynchronizationStatus() -ne 'NotProcessing')
{
Write-Host "Still syncing"
Start-Sleep -Seconds 5
}
#$SuperSeededUpdates = Get-WsusUpdate -Approval Declined -Classification All -Status Any | Where-Object -Property UpdatesSupersedingThisUpdate -EQ -Value 'None' -Verbose
#$SuperSeededUpdates | Approve-WsusUpdate -Verbose
#$SuperSeededUpdates | where Classification -ne "Drivrutiner" | Approve-WsusUpdate -Verbose -Action Install -TargetGroupName "All Computers"
Write-Output "Deny SuperSeeded Updates"
$SuperSeededUpdates = Get-WsusUpdate -Approval AnyExceptDeclined -Classification All -Status Any | Where-Object -Property UpdatesSupersedingThisUpdate -NE -Value 'None' -Verbose
$SuperSeededUpdates | Deny-WsusUpdate -Verbose
Write-Output "Get All Updates except Declined"
$AllUpdates = Get-WsusUpdate -Approval AnyExceptDeclined -Classification All -Status Any
Write-Output "Decline Itanium Updates"
$ItaniumUpdates = $AllUpdates | where { $_.update.Title -like "*Itanium*" -or $_.update.Title -like "*IA64*"}
$ItaniumUpdates | Deny-WsusUpdate -Verbose
Write-Output "Decline ARM64 Updates"
$ARMUpdates = $AllUpdates | where { $_.update.Title -like "*ARM64*" }
$ARMUpdates | Deny-WsusUpdate -Verbose
Write-Output "Decline Windowx XP-Windows 8.1 Client Updates and Windows Server 2008 + 2012 Updates"
$WinClientUpdates = $AllUpdates | where { $_.update.Title -like "*Windows 7*" -or $_.Update.Title -like "*Windows 8*" -or $_.Update.Title -like "*Windows XP*" -or $_.Update.Title -like "*Windows Vista*" -or $_.Update.Title -like "*Windows Server 2008*" -or $_.Update.Title -like "*Windows Server 2012*" } | where { $_.update.Title -notlike "*Windows Server 2012 R2*" } | where { $_.Update.Title -notlike "*Windows Server 2016*" } | where { $_.Update.ProductTitles -notcontains "Windows Server 2016" -and $_.Update.ProductTitles -notcontains "Windows Server 2012 R2" -and $_.Update.ProductTitles -notcontains "Windows 10" }
$WinClientUpdates | Deny-WsusUpdate -Verbose
Write-Output "Decline Preview Updates"
$PreviewUpdates = $AllUpdates | where { $_.update.Title -like "*förhandsversion*" -or $_.update.Title -like "*preview*"}
$PreviewUpdates | Deny-WsusUpdate -Verbose
Write-Output "Decline Wind0 x86 and Feature on Demand Updates"
$Otherupdates = $AllUpdates | where { $_.update.Title -like "*Windows 10 Version * for x86-based Systems*" -or $_.update.Title -like "*Feature*On*Demand*"} | where { $_.update.Title -notlike "*X64*" } | where { $_.update.Title -notlike "*AMD64*" }
$Otherupdates | Deny-WsusUpdate -Verbose
$AllUpdates | where { $_.Update.Title -like "*Language*Feature*On*Demand*" } | Deny-WsusUpdate -Verbose
Write-Output "Decline Beta Updates"
$AllUpdates | where { $_.update.Title -like "*Beta*" } | Deny-WsusUpdate -Verbose
Write-Output "Decline Other Updates"
$AllUpdates | where { $_.update.PublicationState -like "Expired" } | Deny-WsusUpdate -Verbose
$AllUpdates | where { $_.Update.Title -like "*Sharepoint*" } | Deny-WsusUpdate -Verbose
$AllUpdates | where { $_.Update.Title -like "*Multipoint*" } | Deny-WsusUpdate -Verbose
$AllUpdates | where { $_.Update.Title -like "*Windows 10*N,*" } | Deny-WsusUpdate -Verbose
$AllUpdates | where { $_.Update.Title -like "*Windows 10*N version*" } | Deny-WsusUpdate -Verbose
$AllUpdates | where { $_.Update.Title -like "*Windows 10 Education,*" } | Deny-WsusUpdate -Verbose
$AllUpdates | where { $_.Update.Title -like "*InfoPath*" } | Deny-WsusUpdate -Verbose
$AllUpdates | where { $_.Update.UpdateClassificationTitle -like "*Upgrades*" -and $_.Update.Title -like "*Windows 10*" } | Deny-WsusUpdate -Verbose
$AllUpdates | where { $_.Update.ProductTitles -like "*MS Security Essentials*" } | Deny-WsusUpdate -Verbose
$AllUpdates | where { $_.Update.ProductTitles -like "*Security Essentials*" } | Deny-WsusUpdate -Verbose
$AllUpdates | where { $_.Update.ProductTitles -like "*Forefront Endpoint Protection*" } | Deny-WsusUpdate -Verbose
$AllUpdates | where { $_.Update.ProductTitles -like "*Forefront Client Security*" } | Deny-WsusUpdate -Verbose
$AllUpdates | where { $_.Update.ProductTitles -like "*SQL Server*" -and $_.Update.Title -like "*Books*"} | Deny-WsusUpdate -Verbose
$AllUpdates | where { $_.Update.ProductTitles -like "*Silverlight*" }| Deny-WsusUpdate -Verbose
$AllUpdates | where { $_.Update.ProductTitles -like "*Dictionary*" } | Deny-WsusUpdate -Verbose
$AllUpdates | where { $_.Update.ProductTitles -like "*Windows Embedded*" } | Deny-WsusUpdate -Verbose
$AllUpdates | where { $_.Update.ProductFamilyTitles -eq "Forefront" }| Deny-WsusUpdate -Verbose
$AllUpdates | where { $_.Update.ProductFamilyTitles -like "Windows" } | where { $_.Update.ProductTitles -contains "Windows XP" -or $_.Update.ProductTitles -contains "Windows Server 2008" -or $_.Update.ProductTitles -contains "Windows Vista" -or $_.Update.ProductTitles -contains "Windows 7" -or $_.Update.ProductTitles -contains "Windows 8.1" -or $_.Update.ProductTitles -contains "Windows 8" } | where { $_.Update.ProductTitles -notcontains "Windows Server 2016" -and $_.Update.ProductTitles -notcontains "Windows Server 2012 R2" -and $_.Update.ProductTitles -notcontains "Windows 10" } | Deny-WsusUpdate -Verbose
$AllUpdates | where { $_.Update.ProductFamilyTitles -eq "Microsoft Application Virtualization" } | Deny-WsusUpdate -Verbose
#Cleanup WSUS
Write-Output "Cleanup Obsolete Computers"
$CleanupObsoleteComputers = Invoke-WsusServerCleanup -UpdateServer $WSUSSrv -CleanupObsoleteComputers
Write-Output $CleanupObsoleteComputers
Write-Output "Decline Expired Updates"
$DeclineExpiredUpdates = Invoke-WsusServerCleanup -UpdateServer $WSUSSrv -DeclineExpiredUpdates
Write-Output $DeclineExpiredUpdates
Write-Output "Decline Superseded Updates"
$DeclineSupersededUpdates = Invoke-WsusServerCleanup -UpdateServer $WSUSSrv -DeclineSupersededUpdates
Write-Output $DeclineSupersededUpdates
Write-Output "Cleanup Obsolete Updates"
$CleanupObsoleteUpdates = Invoke-WsusServerCleanup -UpdateServer $WSUSSrv -CleanupObsoleteUpdates
Write-Output $CleanupObsoleteUpdates
Write-Output "Cleanup Unneeded Content Files"
$CleanupUnneededContentFiles = Invoke-WsusServerCleanup -UpdateServer $WSUSSrv -CleanupUnneededContentFiles
Write-Output "Diskspace Freed: $([Math]::Round($(($CleanupUnneededContentFiles).Split(":")[1]/1GB),2)) GB"
Write-Output "Compress Updates"
$CompressUpdates = Invoke-WsusServerCleanup -UpdateServer $WSUSSrv -CompressUpdates
Write-Output $CompressUpdates
[void][reflection.assembly]::LoadWithPartialName("Microsoft.UpdateServices.Administration")
$wsus = [Microsoft.UpdateServices.Administration.AdminProxy]::getUpdateServer("$ENV:ComputerName",$False,8530)
$updates = $wsus.GetUpdates()
$license = $updates | Where {$_.RequiresLicenseAgreementAcceptance}
$license | Select Title
$license | ForEach {$_.AcceptLicenseAgreement()}
#Cleanup the SUDB
Write-Output "Defrag and Cleanup DB"
$Command = "sqlcmd.exe"
$Arguments = "-E -S $WSUSDB /i $WsusDBMaintenanceFile"
Invoke-Exe -Executable $Command -Arguments $Arguments
Write-Output "Done"


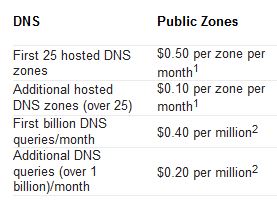 Free DNS Services for some time, but as they are getting harder and harder to use for free. Like you need to remember to logon and click a button once a month and what not. I figured it was time to migrate to Azure DNS instead. Being able to use PowerShell to handle my DNS together with everything I’ve already automated makes my life so much easier. And as I’ve already got a couple of domains and some Azure subscriptions there was more or less no increased cost for me. As you can see in the picture, Azure DNS Pricing is really cheap.