Using Azure DNS for Dynamic DNS with PowerShell

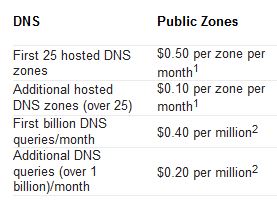
I’ve been using DynDNS and other Free DNS Services for  some time, but as they are getting harder and harder to use for free. Like you need to remember to logon and click a button once a month and what not. I figured it was time to migrate to Azure DNS instead. Being able to use PowerShell to handle my DNS together with everything I’ve already automated makes my life so much easier. And as I’ve already got a couple of domains and some Azure subscriptions there was more or less no increased cost for me.  As you can see in the picture, Azure DNS Pricing is really cheap.
I’ve used Task Scheduler to scheduled the script below to run at Computer Startup on one of my Hyper-V Hosts at home, and then every hour. That guarantees that if there is a power failure and I get a new IP from my ISP, when the server boots, the external DNS pointers will be updated at once and just to be sure check every hour.

In short, the script checks your External IP and compares that to the IP of the hostname you want updated. If they are not identical, it will logon to Azure and update the hostname with your current IP.
Simple as that.

In my case, I’ve setup a UserName in AzureDNS who has access to just that DNSZone and are using that UserName in the script.


You obviously need to migrate an existing or register a new DNS Zone to Azure and use Microsoft’s NameServers for this to work.

 

How to solve EVENT ID 1202 SceCli 0x57 Parameter is incorrect

Customer is repeatedly getting this Event ID on all Servers and Clients, especially on the Domain Controllers being logged every 5 minute.

Searching for that Error gives thousands of results, most less helpful.The way I solved this problem was like this.

  1. On one of the servers having the problem, run RSOP.MSC
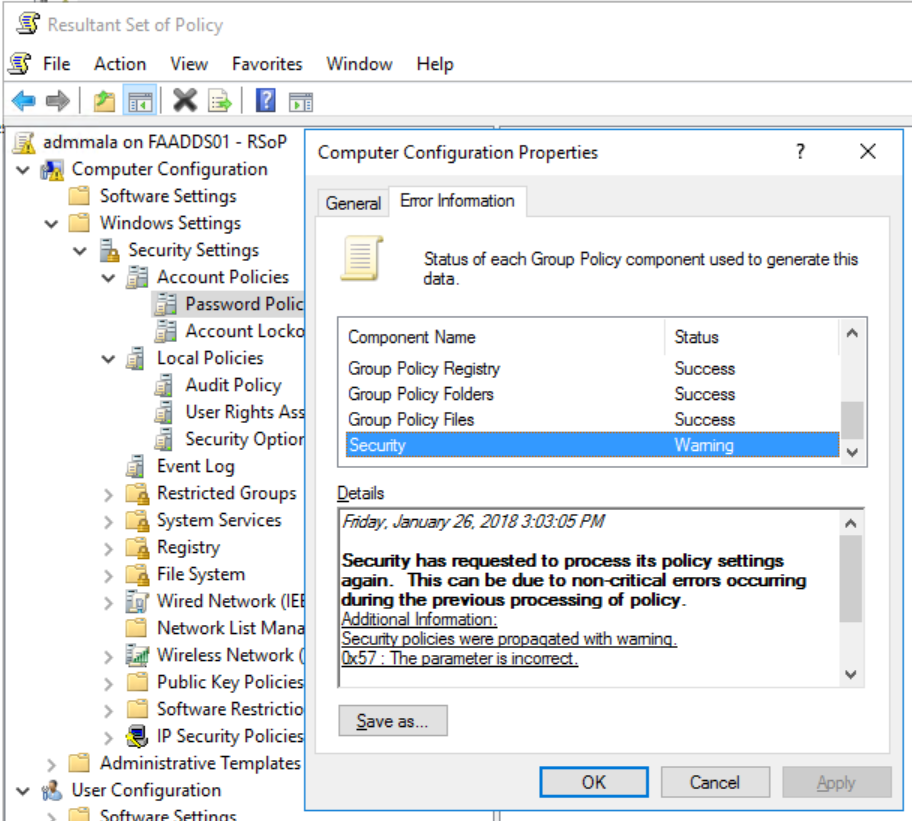
  2. Resultant Set of Policies showed a Warning on the Computer policies. Selecting properties there showed the same error as in our Event Log.
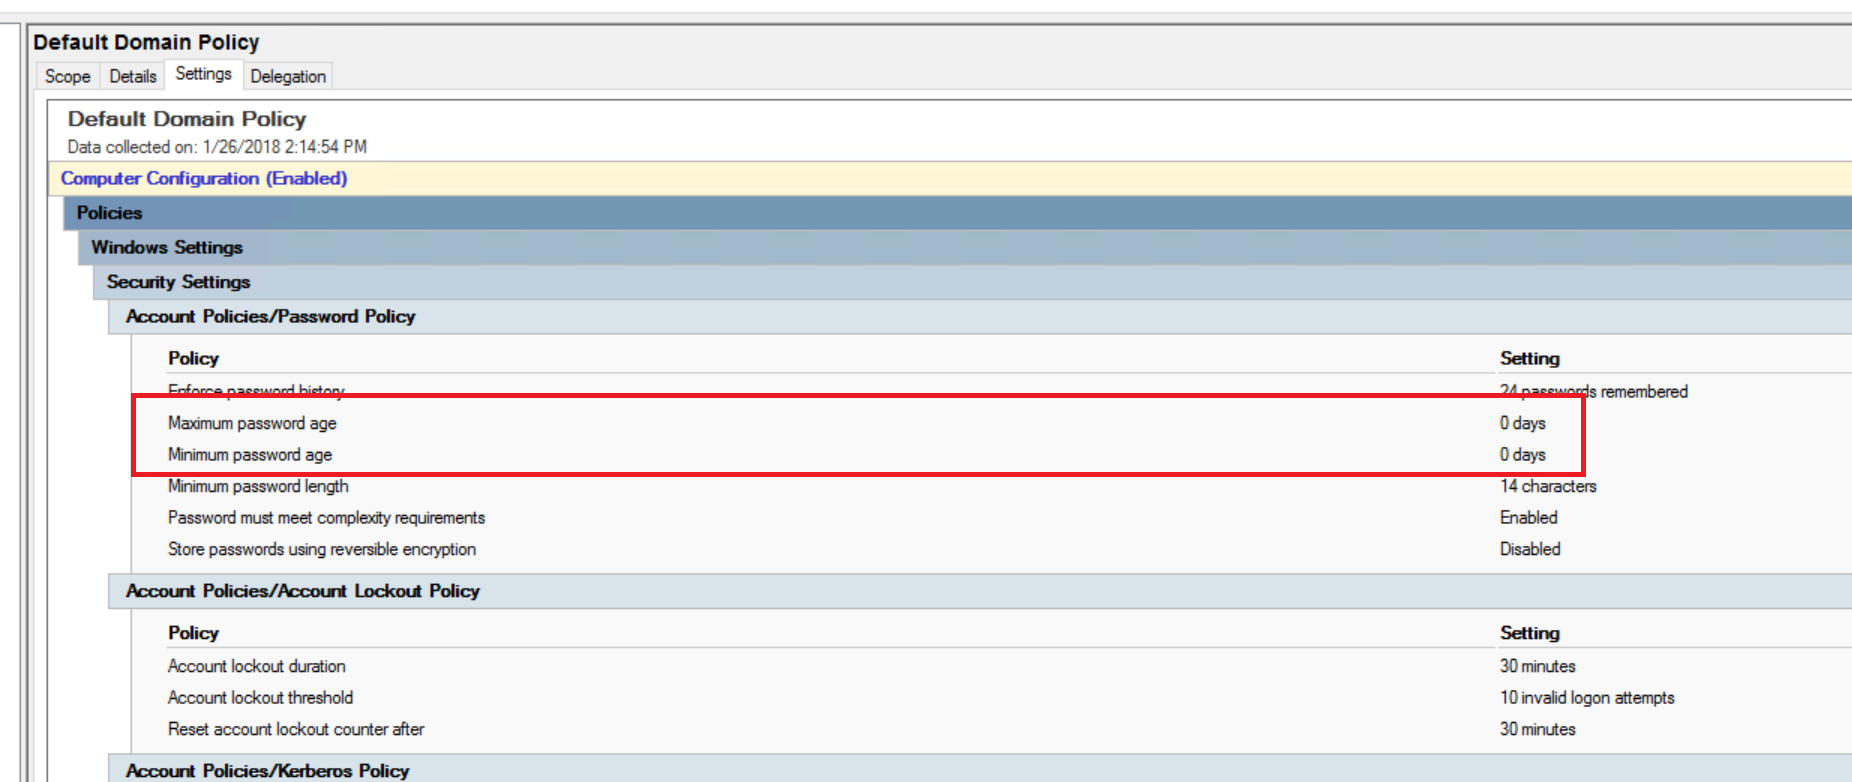
  3. Browsing the Tree showed that there were a problem in the Password Policy section, from the Default Domain Policy.
  4. Which were also visible in GPMC (Group Policy Management Console)
  5. By modifying the Default Domain Policy and fixing the bad entries (no clue how they got there). The Error message (and problem) is now gone.


KB4048953 and KB4049065 fails to install (hungs). How to fix it.

We had a server which failed to install Windows Server / Windows 10 Service Update and November 2017 updates with the names KB4049065 and KB4048953 through Windows Update. The installation simply never completed and it looked like it hung.

Rather than go through all the various (failed) steps I did to troubleshoot it, I’ll just tell how to solve it.

  1. Start by downloading the packages from Microsoft Update Catalog to c:\temp;
    http://www.catalog.update.microsoft.com/Search.aspx?q=KB4049065 http://www.catalog.update.microsoft.com/Search.aspx?q=KB4048953 (Cumulative Update)
  2. Then expand the MSU files (using wusa.exe to install them failed for me) by doing this in a command prompt:
  3. You should now have two folders with files like this;
  4. As this is a Windows Server 2016 (or Windows 10) we can use Powershell rather than Dism to install the cab files into Windows.
  5. Open Powershell with elevated permissions (as Admin).
  6. To install both packages do this, and have patience. It took more than 4 hours for them to install on my server and it looked like the installation hung for a long time around 15%.
  7. When the installation has completed reboot the server and you are done!


Use OMS (Log Analytic) to monitor and send alert for BlueScreen of Death

At times there is a driver or two that’s misbehaving and causing bluescreens. As the server automatically reboots after dumping memory to the memory.dmp file you might not get a report from your users that there has been a problem. And depending on your monitoring tool you might not get an alter there either. Operations Manager can easily alert you for things like that, but far from all customers use OpsMgr due to it’s complexity. Luckily, it’s just a 1 minute job to get alert in OMS if you have got a bluescreen! And as OMS can be run in Free mode, you may be able to monitor your servers for free (all depending on the amount of data you collect) and else, it’s really cheap so no big deal if you need to use a standard subscription. Anyway, lets get to the technical stuff!

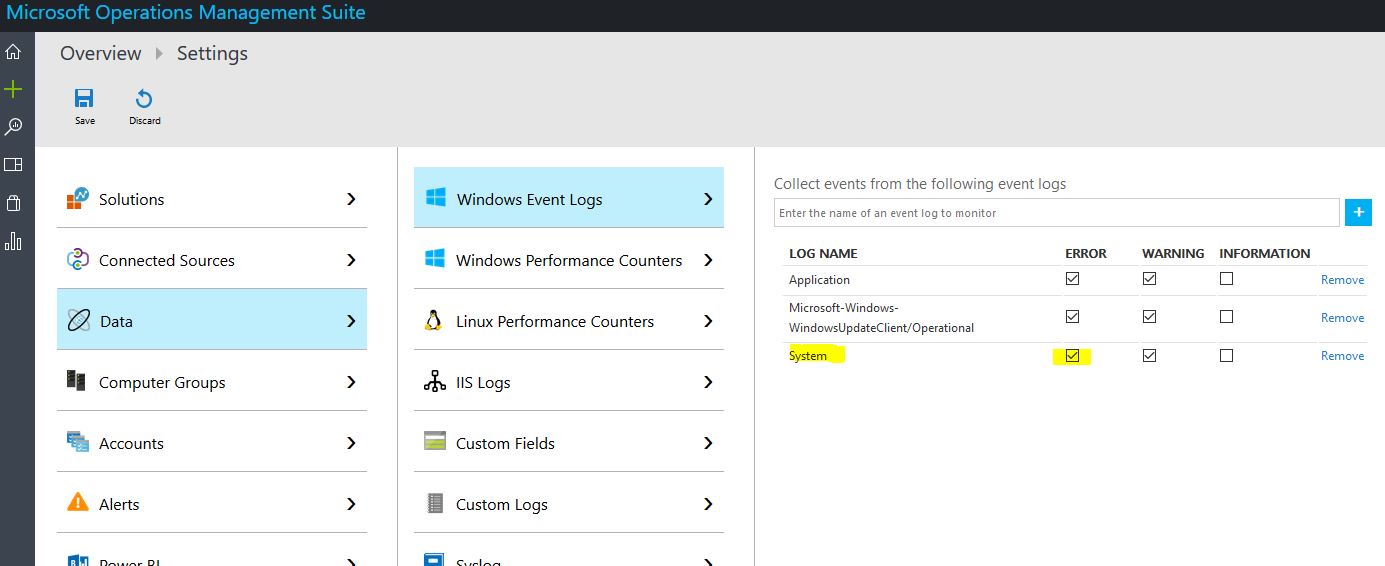
First of all, enable OMS to collect Eventlog System and all Error messages.

omserrordata

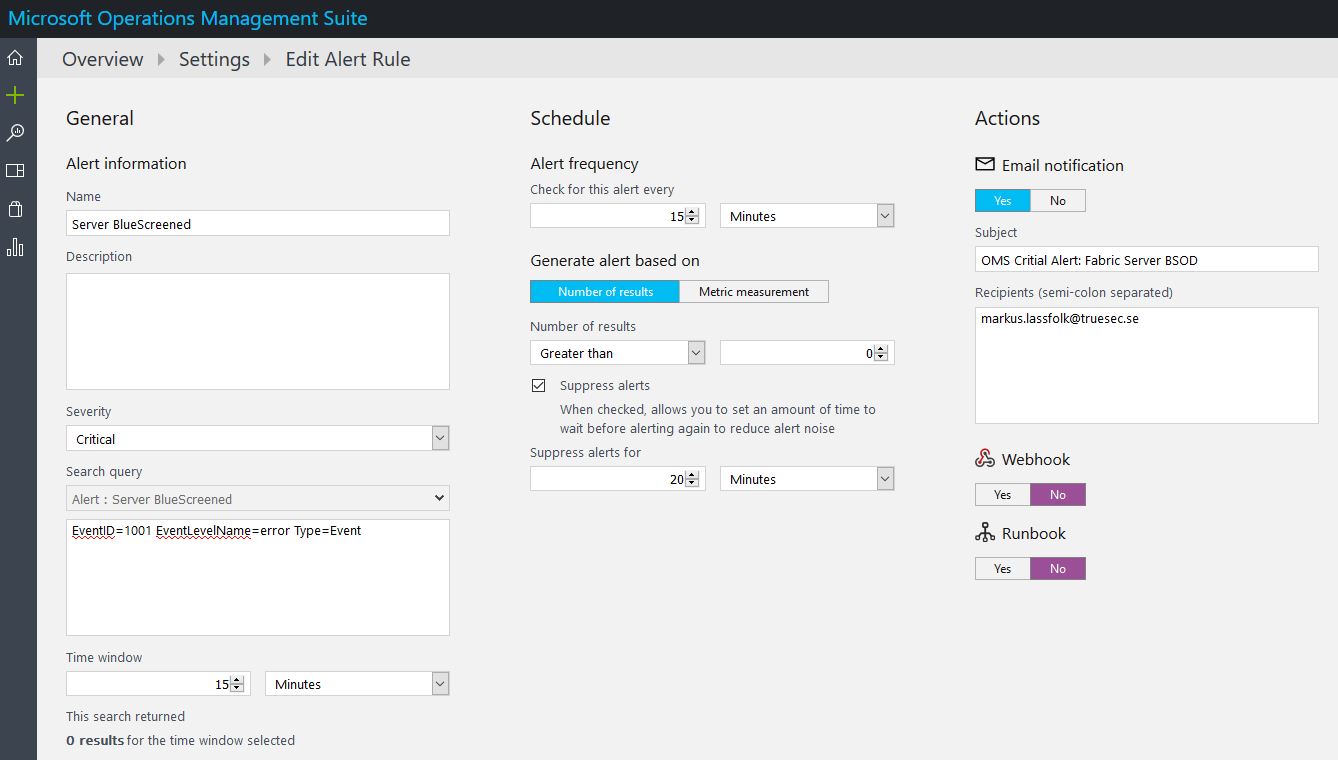
Then create an Alert like this,

oms_bsod

The Alert text to be used is:

That will only alert for Crashes. You can also enable an alert for Event ID 6008 which will alert you for an unexpected shutdown. The difference is that my alert will only send an alert if there was a BSOD while an unexpected alert could also alert if someone pulled the power. Or even combine both into one alert with an OR statement. In my case, I just want to get alerted about the BSOD’s so thats the only thing I look for right now.

Tell how often is should check. There is usually no need to check more than once or twice an hour. And finally define if it should send an email alert or use one of the other alert methods.

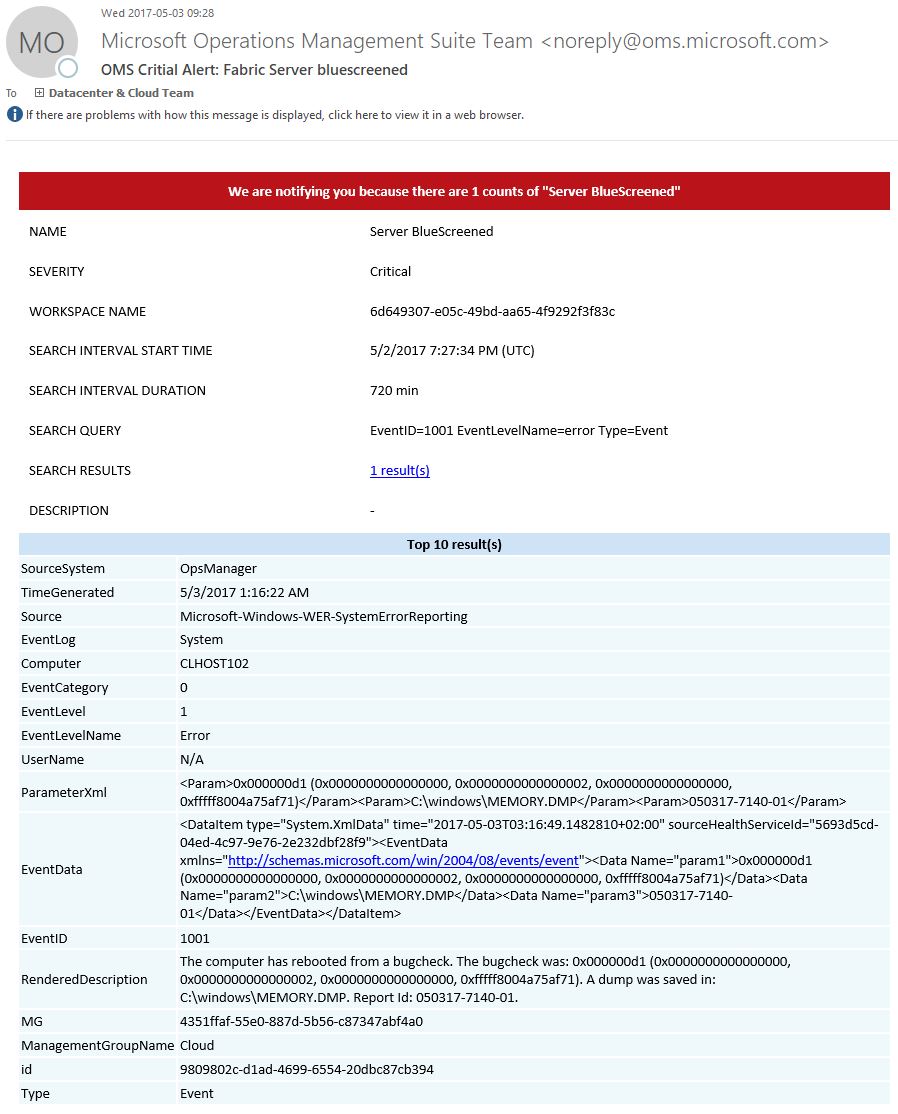
Easy as that! Next time you get a bluescreen on a server, you will get an alert by mail so you can debug the dump and find out what’s causing it.

It will look like this,

bsodmail


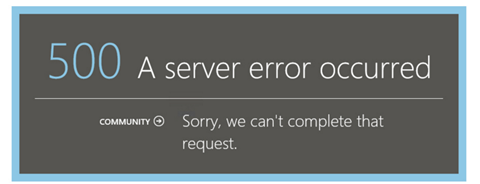
Error 500 in Azure Pack when using ADFS

I’ve had a couple of customers lately who’s had sudden issues with Azure Pack reporting a error 500 when used in combination with ADFS after logging on.

It’s because the ADFS Certificate has been updated and the thumbprint in WAP doesn’t match the one presented from ADFS anymore.

Mark has made a great post about it here (all credits to him for the solution): Error 500 Azure Pack tenant portal – Jwt10329 Error

I’ve modified Mark’s script a little bit so I can easily run it at various customers without modifying the URL’s. It will basically read the old value from the config and re-use that hostname for the ADFS dns entry.

This script assumes you are using ADFS for both the tenant and admin sites.

Just update the HOST, Username and Password and run the script on the AdminSite server. When done, logon to AzurePack as normal.


Enable driver verifier for all none-microsoft drivers with powershell

I’ve been doing some debugging for a customer, who has multiple industrial Client PC’s who are rebooting regularly. And to get more information in the memory dumps I had a need to configure the system to do a complete memory dump but also to enable extra verification of all drivers in the system to find the cause of the bluescreens.

Window has a built in tool called “Verifier” where you can enable extra checks on calls done by specific drivers. You generally don’t want to enable it on all drivers as that will slow down the system notable. And truthfully, the number of times it’s a Microsoft device driver who’s causing the issue is so small, because they check and stress test their drivers so much better than all the other vendors. Thus, it’s always better to enable the extra checks for all drivers, except the ones from Microsoft to start with.

As I didn’t want to run around to all the Client PC’s and configure verifier, I’ve made a small powershell script that reads the name of all none-microsoft drivers from the system and enabled verification for just those drivers. Which can then be execute in any number of ways.

It’s using both the Get-VMIObject and Get-WindowsDrivers to get a complete list of thirdparty drivers in the system. And it will also configure the system for a Complete Memory Dump.

Just to be safe, I’ve added /bootmode resetonbootfail so it will reset the verifier settings in case the system is bluescreening during boot due to verifier notificing a bad driver in the boot process.

Reboot the PC, get a big cold Coke and wait for the bluescreen to happen.

Addition to new-wifimac address script

A reader asked if there was a way to reset the mac-address to the original value after using my script to set a random MAC address. But also if it’s possible to schedule the script to run every XX minutes as the local coffee shop restricts internet access to 15 minutes per custo…ehh sorry, per MAC Address!

Here is a small function to reset the mac-address, by changing it to 00-00-00-00-00-00 windows will use the default hardware MAC Address of your card.

Regarding the automatic scheduling of the script. There are a couple of different ways to do that with pros and cons. It’s for example possible to start the script with Windows Task Scheduler ever X minute or let it automatically run, sleep for XX minutes and then execute again, over and over again until you stop it.

It’s even possible to have Windows Task Scheduler monitor the Event log for new Wifi Connections and if there is a connection to the Coffee House WiFi network, then start the script.

But for now, I’ve just added a very basic Loop, which you can add to the script and execute. It will generate a new random MAC Address every 13 minute (13*60 = 780 seconds) and do that 4 times before you have to restart it or you can just adjust the numbers.

Change MAC Address with PowerShell of a Wireless Adapter

As I mentioned in my post a week ago, I’m commuting each day and there is a 200MB Quota on the Wireless Network. Luckily it’s based on the MAC Address of the WiFi Card, so it’s quite easy to get another 200MB Quota if you want  😉

wifi1

Here is my small powershell script that automatically Releases the IP Address, set’s a new random MAC Address and Re-Connects to the SSID, all done in a second or two.
Yay! Another 200MB Quota to burn.


I’m using a Window 10 client with Hyper-V, and I’ve created a Virtual NIC for the WiFi adapter, that’s why it’s called ‘vEthernet (External Wi-Fi)’.  But you should be able to use the script with a normal WiFi Adapter too.

I’m using a Virtual WiFi Adapter, to be able to give my Virtual Machines access to internet also when I’m without a LAN.

Here is the script for creating a Virtual WiFi NIC;


Block a Service (BITS) when on Wireless and specific Subnet

I’m commuting by train each day, working. The train has a free wireless network, but it’s limited to 200MB traffic, and is then reduced to snail speed. Luckily, it’s restricted by MAC-Address so it’s quite easy to get another 200MB when you run out 😉
Though, yesterday, I ran out of my 200MB quota in less than 7 minutes, which made me confused. A quick check confirmed what I suspected. Yepp, a new build of Windows 10 – fast ring is being downloaded and eating my quota.

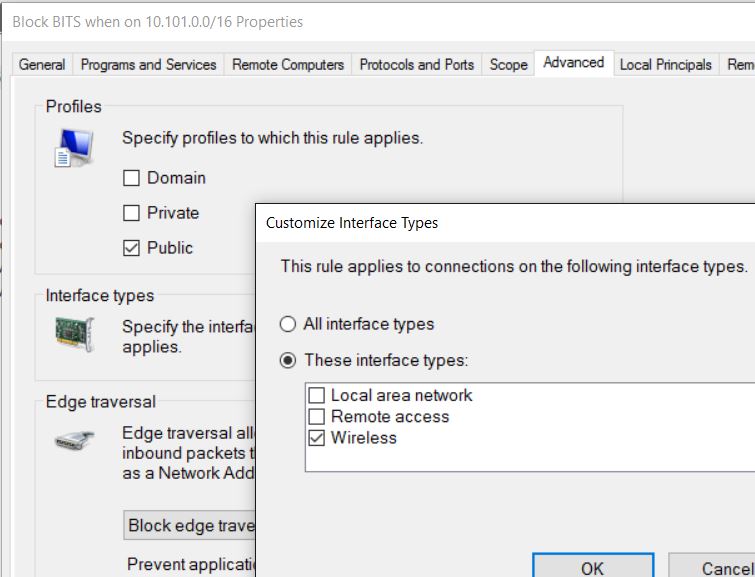
Quick solution; create a Windows Firewall rule that blocks BITS from downloading stuff when on Wireless and using the trains subnet.

fw1

Here is the PowerShell syntax to create a similar rule.

Yay! No more problems with eating the quota while on the train.

Should the image contain hotfixes or not?

One more post in my WSUS/Hotfix series of blogposts. I’ve been asked a couple of times how we approve Hotfixes and if we include them in the images.

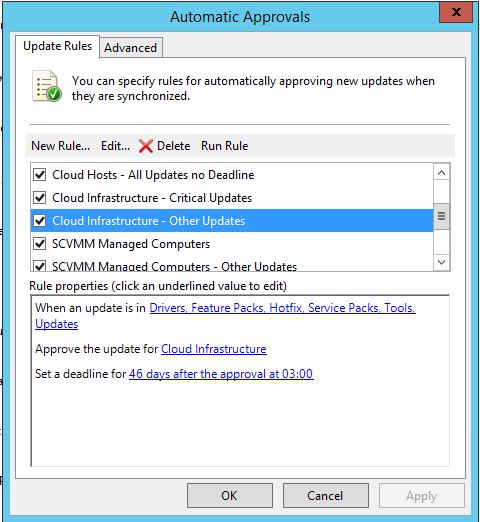
I’ve made an Autoapproval Rule where we approve all Hotfixes automatically to the various Computer Groups with a Deadline, like this.

wsus16

And this is how the details looks like;

wsus17

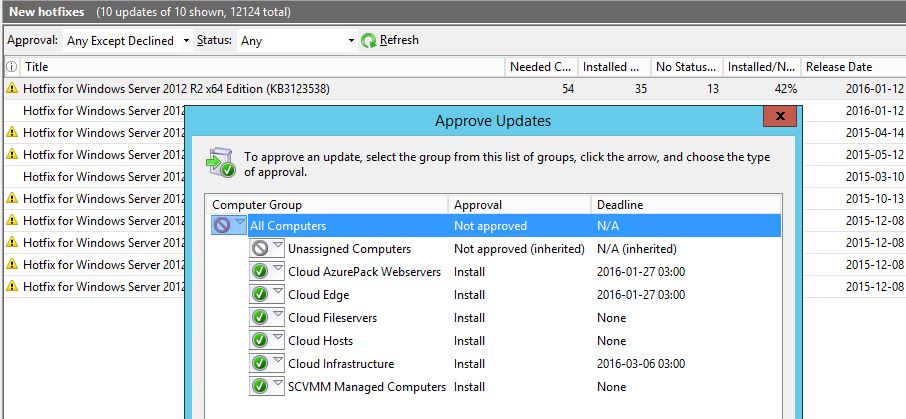
First of all, any server that could cause problems if it automatically rebooted doesn’t have a Deadline, thats servers like Hyper-V Hosts and SOFS Nodes. Those servers are managed by SCVMM’s (System Center Virtual Machine Manager) Patch Management. VMM has a feature to put a cluser node in maintenance mode, automatically drain the node of VM’s, patch it, and then bring the node back online again before it takes the next node.  So we handle all patching of clustered servers from SCVMM. While we let the WSUS Client handle all other servers. We might add SCCM to the mix some day and let it handle all of the servers, but as most of our customers don’t want to run SCCM to manage their Fabric, this is the way we do it now.

By putting a deadline, we know the hotfix will be installed sooner or later. And if there is a Patch Tuesday before that date, it will also install the hotfixes at the same time.

Notice that the hotfix is NOT approved for All Computers and NOT for Unassigned Computers. How come?

When we build a VM image for any OS, it’s done automatically through MDT. Those VM’s are ending up in Unassigned Computers as they don’t have a role yet and we don’t want any Hotfixes in the images. Of course, if there is a mandatory hotfix whish is needed to make the image or deploy it, that one will be included!

The reasons we don’t want any hotfixes in an image is quite simple if you think about it. There are two main reasons really.
The first one is that if we make an image in august, which contains hotfixes. When we deploy that image 3 months later, there is a big chance that the hotfix we had in the image is replaced by a proper update from Microsoft so there was no use for the hotfix in the first place.
Second, when we create an image, we don’t add Clustering, Hyper-V and other roles and features to the image, right? So Windows will then only install the hotfixes for the core OS. And when the image is later deployed and someone adds the Hyper-V Role, it would install hotfixes for that role then. So the server wouldn’t be fully patched anyway so adding 5 or 15 hotfixes automatically after deployment doesn’t really make much of a difference.
Third, a minor reason is also that we normally use the same images for Fabric, Workload and Tenants and we like to keep them quite generic.

Here is a great blogpost about making reference images from my colleague Mikael Nystrom.