Get GeoLocation with PowerShell and set NTP Server in a GPO

Using Powershell to locate your Geographical Location with the help of GeoLocation (IP-Address) is quite easy, cool and useful!

When we build Private and Hybrid Clouds across the globe in various countries and continents I want to make sure the Active Directory PDC Emulator is using a valid time source based on that location.

GeoLocation with Powershell

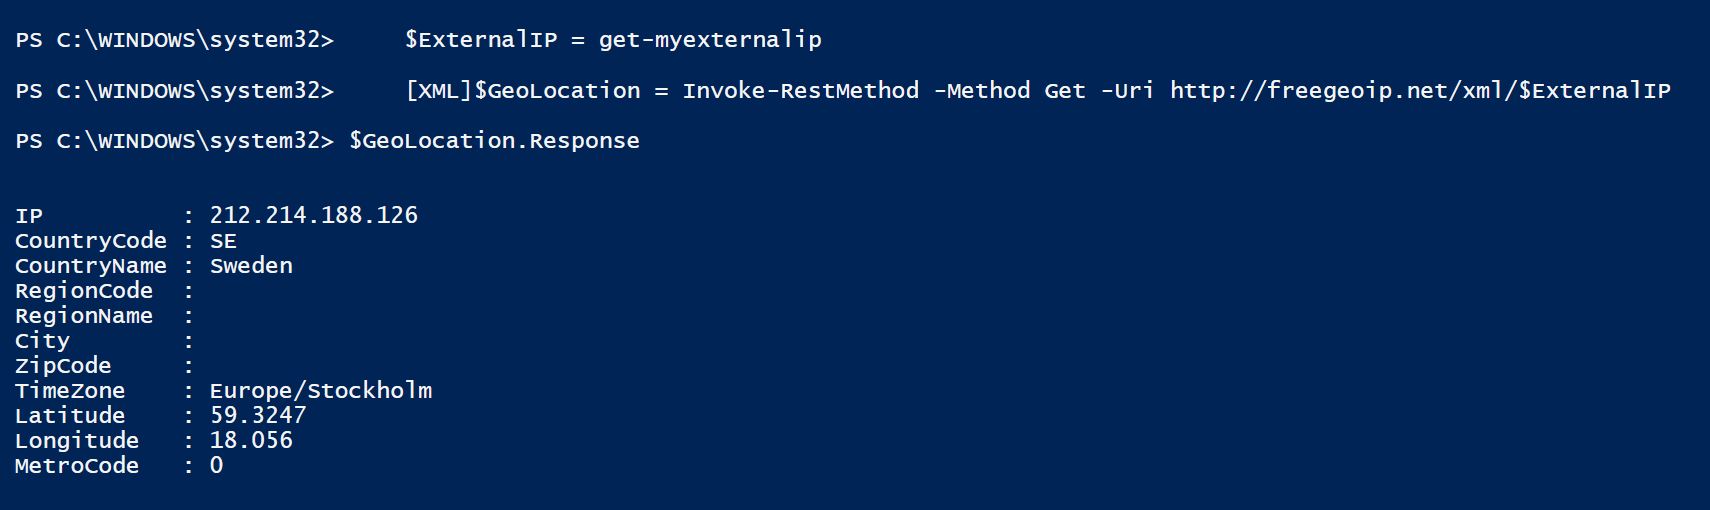
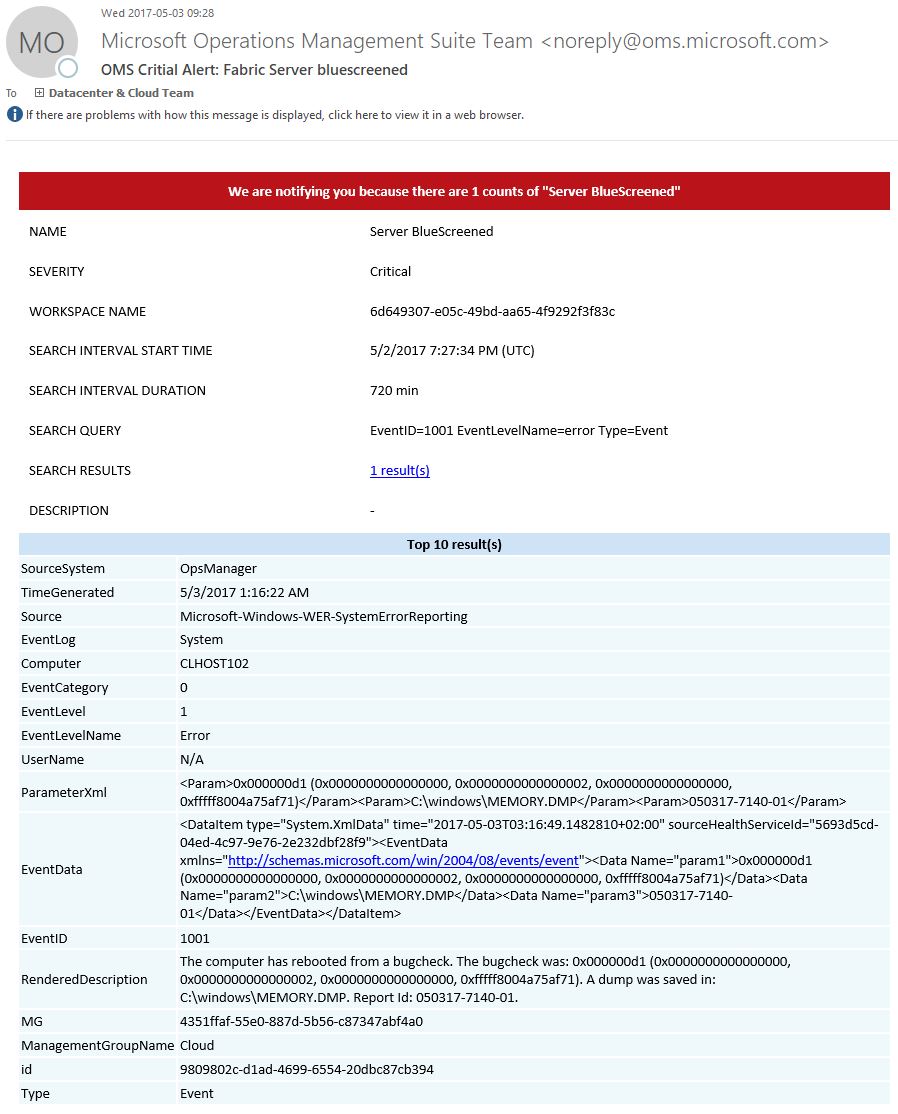
So with this small script (it’s using multiple WebServices to cycle through until it gets an answer) we can get a rough location for where we are and in my case it’s usually enough to know what country the datacenter is in.

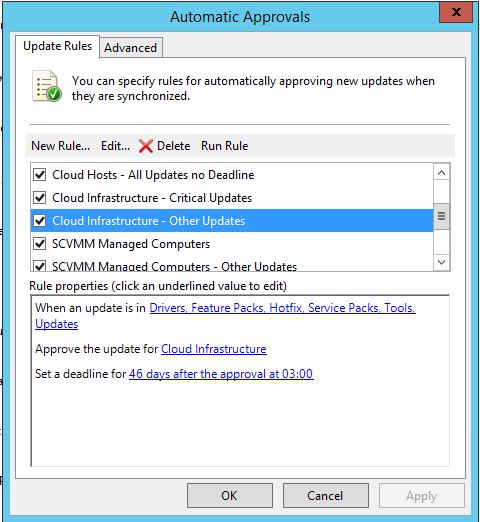
That can then be used as you see fit. Though for me, I’m using it to update the Group Policy being applied to the PDC Emulator to point to the country specific NTP Pool with the generic pool as backup value.

That’s how easy it’s to modify a Group Policy object.

Please share any solutions using GeoLocation in the comments. It might give me some nice new ideas too!


Azure Stack packaging and pricing

Microsoft has finally released the pricing for Microsoft Azure Stack.
It’s long been known that MAS (Microsoft Azure Stack) would be prices on a Pay-as-you-go model just like Azure but we’ve not known the exact price so far. HPE revealed the price for the hardware a few weeks ago and it’s been said to be between 300-400.000 USD minus all the normal discounts.

Microsoft Azure Stack pricing

It looks like the price is roughly 30% of running the same Virtual Machine in Azure. Which makes MAS a very very attractive solution for running workloads on-prem.

Details available here: http://buff.ly/2usAdoI
Or download directly from my blog here: Microsoft_Azure_Stack_Packaging_and_Pricing_EN_US-1


How to delete files in a userprofile with Group Policy Preferences

As a follow up to my post about How to automatically Hide “Configure this local server” in Server Manager. I mentioned it’s possible to remove the individual user.config files in various ways to reset the behavior and hide the Welcome Tile. You can easily do that with a GPO like this;

Paths:

It’s a Group Policy being applied to all Server Admins utilizing Group Policy Preferences to delete two files (one for Windows Server 2012R2 and one for Windows Server 2016). But it’s only doing it once to make sure that if a admin does any changes to the file it won’t be deleted again. The idea is that it will be deleted once to reset settings to the one in ServerManager.exe.config but not repeatedly after that if the administrator saves any other changes.


How to automatically Hide “Configure this local server” in Server Manager

After you have installed a couple of hundred servers, you may start to feel that you have seen this text a couple of times too many and start to wonder how to get rid of it…

Hide Welcome Tile

You can obviously click the “Hide” button to hide the “Configure this local server” box, which is also called “Welcome Tile”.

Show Welcome Tile

And if you would ever want to get it back, you can find it in the “View Menu”. BUT… How do you disable the Welcome Tile by default for all users?

There is unfortunately no GPO (Group Policy) to control that. Just to set if Server Manager should auto-start or not. Which does not help in this case.

The settings in Server Manager is stored in a version folder in this location:

The configuration for Server Manager is stored in a file called user.config with the interesting bits highlighted here;

WelcomeTileVisibility

So you want to Modify the “WelcomeTileVisibility” setting in that file which can be done in numerous ways. But a easier solution is to just name and copy a file with this content to that folder.

user.config

That file only contains new default WelcomeTileVisibility setting, hiding the Welcome tile for you when you launch Server Manager. And if you do any changes in Server Manager, the new settings will be saved to that file too.

But that’s a per user setting and it has to be copied to the profile after it’s been created etc etc. Making it all a bit more complicated.
Luckily there is a better and easier way to do it, where you also help your co-workers at the same time!

In your reference image, or in your Server deployment script or with PowerShell or with Group Policies or any other way you find worthy. Just use the same information as above, but save it in this path to be machine wide;

Hide Welcome Tile for everyone

Notice that it’s still the exact same content of the file;

But it’s now stored together with the ServerManager.exe file in the system32 folder making it server wide. It’s a lot easier to copy it there just once so it’s applied to everyone rather than try to get the config file into each persons profile.

Notice: If you already have a user.config file in your Profile, it may override the settings from serverManager.exe.config so delete your user.config file to verify your new setup is working as expected.

In our environment, we are deploying the file in our Server Deployment solution, and also copying it to all server with a Group Policy Preference just in case someone installed a server manually for some unknown reason.


Use OMS (Log Analytic) to monitor and send alert for BlueScreen of Death

At times there is a driver or two that’s misbehaving and causing bluescreens. As the server automatically reboots after dumping memory to the memory.dmp file you might not get a report from your users that there has been a problem. And depending on your monitoring tool you might not get an alter there either. Operations Manager can easily alert you for things like that, but far from all customers use OpsMgr due to it’s complexity. Luckily, it’s just a 1 minute job to get alert in OMS if you have got a bluescreen! And as OMS can be run in Free mode, you may be able to monitor your servers for free (all depending on the amount of data you collect) and else, it’s really cheap so no big deal if you need to use a standard subscription. Anyway, lets get to the technical stuff!

First of all, enable OMS to collect Eventlog System and all Error messages.

omserrordata

Then create an Alert like this,

oms_bsod

The Alert text to be used is:

That will only alert for Crashes. You can also enable an alert for Event ID 6008 which will alert you for an unexpected shutdown. The difference is that my alert will only send an alert if there was a BSOD while an unexpected alert could also alert if someone pulled the power. Or even combine both into one alert with an OR statement. In my case, I just want to get alerted about the BSOD’s so thats the only thing I look for right now.

Tell how often is should check. There is usually no need to check more than once or twice an hour. And finally define if it should send an email alert or use one of the other alert methods.

Easy as that! Next time you get a bluescreen on a server, you will get an alert by mail so you can debug the dump and find out what’s causing it.

It will look like this,

bsodmail


Error 500 in Azure Pack when using ADFS

I’ve had a couple of customers lately who’s had sudden issues with Azure Pack reporting a error 500 when used in combination with ADFS after logging on.

It’s because the ADFS Certificate has been updated and the thumbprint in WAP doesn’t match the one presented from ADFS anymore.

Mark has made a great post about it here (all credits to him for the solution): Error 500 Azure Pack tenant portal – Jwt10329 Error

I’ve modified Mark’s script a little bit so I can easily run it at various customers without modifying the URL’s. It will basically read the old value from the config and re-use that hostname for the ADFS dns entry.

This script assumes you are using ADFS for both the tenant and admin sites.

Just update the HOST, Username and Password and run the script on the AdminSite server. When done, logon to AzurePack as normal.


Swedish Windows Azure Stack User Group

For my Swedish community members who’s interested in Microsoft Azure Stack. There is now a Swedish Windows Azure Stack User Group on Facebook, where we share knowledge, information and discuss everything around Microsoft Azure Stack and Windows Azure Pack.

Welcome to join! https://www.facebook.com/groups/MASUGSWE/


Should the image contain hotfixes or not?

One more post in my WSUS/Hotfix series of blogposts. I’ve been asked a couple of times how we approve Hotfixes and if we include them in the images.

I’ve made an Autoapproval Rule where we approve all Hotfixes automatically to the various Computer Groups with a Deadline, like this.

wsus16

And this is how the details looks like;

wsus17

First of all, any server that could cause problems if it automatically rebooted doesn’t have a Deadline, thats servers like Hyper-V Hosts and SOFS Nodes. Those servers are managed by SCVMM’s (System Center Virtual Machine Manager) Patch Management. VMM has a feature to put a cluser node in maintenance mode, automatically drain the node of VM’s, patch it, and then bring the node back online again before it takes the next node.  So we handle all patching of clustered servers from SCVMM. While we let the WSUS Client handle all other servers. We might add SCCM to the mix some day and let it handle all of the servers, but as most of our customers don’t want to run SCCM to manage their Fabric, this is the way we do it now.

By putting a deadline, we know the hotfix will be installed sooner or later. And if there is a Patch Tuesday before that date, it will also install the hotfixes at the same time.

Notice that the hotfix is NOT approved for All Computers and NOT for Unassigned Computers. How come?

When we build a VM image for any OS, it’s done automatically through MDT. Those VM’s are ending up in Unassigned Computers as they don’t have a role yet and we don’t want any Hotfixes in the images. Of course, if there is a mandatory hotfix whish is needed to make the image or deploy it, that one will be included!

The reasons we don’t want any hotfixes in an image is quite simple if you think about it. There are two main reasons really.
The first one is that if we make an image in august, which contains hotfixes. When we deploy that image 3 months later, there is a big chance that the hotfix we had in the image is replaced by a proper update from Microsoft so there was no use for the hotfix in the first place.
Second, when we create an image, we don’t add Clustering, Hyper-V and other roles and features to the image, right? So Windows will then only install the hotfixes for the core OS. And when the image is later deployed and someone adds the Hyper-V Role, it would install hotfixes for that role then. So the server wouldn’t be fully patched anyway so adding 5 or 15 hotfixes automatically after deployment doesn’t really make much of a difference.
Third, a minor reason is also that we normally use the same images for Fabric, Workload and Tenants and we like to keep them quite generic.

Here is a great blogpost about making reference images from my colleague Mikael Nystrom.


Semi-Automatic Hotfix import into WSUS

One of my blogreaders, Andreas Fjellner, came up with a way to make the import of hotfixes a bit faster than copy and paste.

You can download a XML file with all the Hotfixes I’ve got imported so you don’t have to do a findstr or excel filtering from the previous blogpost, the XML file contains the same list as shown here List of Private Cloud related Hotfixes – 2016-02-03

Download: XML File (notice the Download button at the top so you don’t have to copy and paste). Save the file as c:\temp\details.xml on your WSUS Server and then run this script;

It will spawn one internet explorer for each Hotfix with the correct URL. Just click ADD to basket. Close the IE Window and pick the next window.
When you are done with the first batch of 20 hotfixes, use the “Import updates” link as described here: Importing Hotfixes and Drivers directly into WSUS and you will now be able to import all hotfixes into your WSUS. And now press Y in the powershell window to take the next batch of hotfixes. Repeat until done.

Another way is to use AutoIT to make a script that moves the mouse and clicks on the right place doing the import semi-automatic, as another blogreader pointed out. There is always a way!

Importing Hotfixes and Drivers directly into WSUS

I got a comment on my previous blogpost.

Could you please clarify the import bit with paste:ing the uri into Wsus IE.
If you paste the Uri into the address field it wants do dowload the update and not import it.

You are right, I was very unclear about that and should have explained it, thanks for asking Patrik.

This process can be used to import anything from the Microsoft Update Catalog, including Drivers and public Hotfixes.

Start by opening your WSUS Console, and click on “Import Updates”.
It has to be done that way to get the “import” option, else you will only be able to download the files.

wsus10


An normal Internet Explorer will now open. If this is the first time you are doing this, you will be prompted to approve an activex component and you may have to trust the updates website too.

wsus11


You can either search for hotfixes (or drivers) by their name, or just paste the MUUri that’s listed on each hotfix in my post here: http://www.isolation.se/list-of-private-cloud-related-hotfixes-2016-02-03/  And then click on Add to put the hotfixes in your basket.

wsus12


When you have added a couple of hotfixes to the basket click on “View Basket”. My experience is that adding too many hotfixes will make the Microsoft Update site timeout and be unresponsive. So I usually import the hotfixes or drivers in batches of 20-30 at the same time.

wsus13

Notice in the picture above, how there is no Import but just the normal Download button. If that happens, just switch back to the Windows Update Admin console, and click import updates again. A new tab will open in IE, it will remember all your items in the basket and a Import Directly into Windows Server Update Services checkbox exists now!

wsus14

Just import the hotfixes to WSUS that way, and approve them manually or make an Auto Approval Rule. Done!

The bad part, is as I mentioned in a previous blogpost, that you have to copy and paste each hotfix url into IE. I’ve not managed to figure out a way to script the import as it’s a ActiveX component doing all the work.