function random-mac {
$mac = "02"
while ($mac.length -lt 12)
{
$mac += "{0:X}" -f $(get-random -min 0 -max 16)
}
$Delimiter = "-"
for ($i = 0 ; $i -le 10 ; $i += 2)
{ $newmac += $mac.substring($i,2) + $Delimiter }
$setmac = $newmac.substring(0,$($newmac.length - $Delimiter.length))
$setmac
}
function disconnect-wifi {
$CurrentSSID = (& netsh wlan show profiles | Select-String 'Current User Profile' | Foreach-Object {$_.ToString()}).replace(" Current User Profile : ","$null")
Write-Host "Current WLAN SSID: $CurrentSSID" -ForegroundColor Yellow
$WIFI = Get-WmiObject -Class Win32_NetworkAdapterConfiguration | Where { $_.IpEnabled -eq $true -and $_.DhcpEnabled -eq $true}
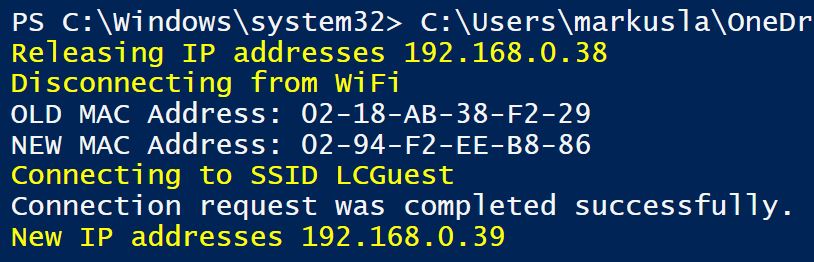
Write-Host "Releasing IP addresses:" ($WIFI.IPAddress | select -first 1) -ForegroundColor Yellow
$WIFI.ReleaseDHCPLease() | out-Null
# Make sure the Release have happened, else it give it 2 sec extra.
$WIFI = Get-WmiObject -Class Win32_NetworkAdapterConfiguration | Where { $_.IpEnabled -eq $true -and $_.DhcpEnabled -eq $true}
if ($WIFI.DefaultIPGateway -ne $Null) {
Write-Output "Release of IP Address had not completed, waiting 1 Seconds"
sleep -Seconds 2
}
Write-Host "Disconnecting from WiFi" -ForegroundColor Yellow
& netsh wlan disconnect | Out-Null
}
function new-wifimac ($wifiadapter, $ssid, $newmac){
# Write-Output "Wifi AdapterName: $wifiadapter"
# Write-Output "SSID: $ssid"
# Write-Output "New MAC Address to set: $newmac"
$oldmac = (Get-NetAdapter -Name $wifiadapter).MACAddress
Write-Output "OLD MAC Address: $oldmac"
if ($oldmac -like $newmac) {
Write-Host "Old MAC and New MAC are identical, generating a new MAC Address" -ForegroundColor Red
$newmac = random-mac
Write-Output "New MAC Address to set: $newmac"
}
Get-NetAdapter -Name $wifiadapter | Set-NetAdapter -MACAddress $newmac -Confirm:$false
Get-NetAdapter -Name $wifiadapter | Disable-NetAdapter -Confirm:$false
Get-NetAdapter -Name $wifiadapter | Enable-NetAdapter -Confirm:$false
$currentmac = (Get-NetAdapter -Name $wifiadapter).MACAddress
Write-Output "NEW MAC Address: $currentmac"
Write-Host "Connecting to SSID: $ssid" -ForegroundColor Yellow
& netsh wlan connect name=$ssid ssid=$ssid
$NoIP = 0
Do {
$WIFI = Get-WmiObject -Class Win32_NetworkAdapterConfiguration | Where { $_.IpEnabled -eq $true -and $_.DhcpEnabled -eq $true}
if ($WIFI.DefaultIPGateway -ne $null) {
$NoIP = 5
}
else {
sleep -Seconds 2
Write-Host "Waiting for IP Address"
$NoIP += 1
}
} While ($NoIP -lt 5)
Write-Host "New IP addresses" ($WIFI.IPAddress | select -first 1) -ForegroundColor Yellow
}
function test-wifi ($probe){
if (Test-NetConnection -ComputerName $probe -CommonTCPPort HTTP -InformationLevel Quiet) {
$result = "Working"
}
else {
$result = "NotWorking"
}
$result
}
# Specify $SSID manually
# $ssid = 'SSID-to-Connect-to'
#
# Or use the currently used SSID to reconnect to.
$ssid = (& netsh wlan show interfaces | Select-String ' SSID ' | Foreach-Object {$_.ToString()}).replace(" SSID : ","$null")
# Specify WLAN Adapter Name Manually
# $wifiadapter = 'vEthernet (External Wi-Fi)'
#
# Or Try to identify the Wi-Fi Adapter
$wifiadapter = (Get-NetAdapter | where Status -EQ "Up" | where MediaType -EQ "802.3" | where MacAddress -EQ (Get-WmiObject -Class Win32_NetworkAdapterConfiguration | Where { $_.IpEnabled -eq $true -and $_.DhcpEnabled -eq $true} | select *).MACAddress.replace(":","-")).Name
# Specify a MAC Address manually
# $newmac = "02-F4-D7-B2-FE-D8"
#
# Or generate a new Random MAC Address
$newmac = random-mac
disconnect-wifi
new-wifimac -wifiadapter $wifiadapter -ssid $ssid -newmac $newmac
test-wifi -probe www.msftncsi.com

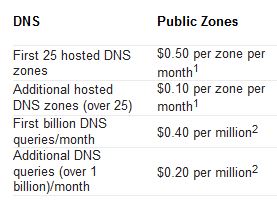 Free DNS Services for some time, but as they are getting harder and harder to use for free. Like you need to remember to logon and click a button once a month and what not. I figured it was time to migrate to Azure DNS instead. Being able to use PowerShell to handle my DNS together with everything I’ve already automated makes my life so much easier. And as I’ve already got a couple of domains and some Azure subscriptions there was more or less no increased cost for me. As you can see in the picture, Azure DNS Pricing is really cheap.