Using Azure DNS for Dynamic DNS with PowerShell

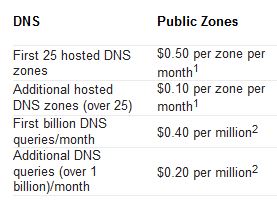
I’ve been using DynDNS and other Free DNS Services for  some time, but as they are getting harder and harder to use for free. Like you need to remember to logon and click a button once a month and what not. I figured it was time to migrate to Azure DNS instead. Being able to use PowerShell to handle my DNS together with everything I’ve already automated makes my life so much easier. And as I’ve already got a couple of domains and some Azure subscriptions there was more or less no increased cost for me.  As you can see in the picture, Azure DNS Pricing is really cheap.
I’ve used Task Scheduler to scheduled the script below to run at Computer Startup on one of my Hyper-V Hosts at home, and then every hour. That guarantees that if there is a power failure and I get a new IP from my ISP, when the server boots, the external DNS pointers will be updated at once and just to be sure check every hour.

In short, the script checks your External IP and compares that to the IP of the hostname you want updated. If they are not identical, it will logon to Azure and update the hostname with your current IP.
Simple as that.

In my case, I’ve setup a UserName in AzureDNS who has access to just that DNSZone and are using that UserName in the script.


You obviously need to migrate an existing or register a new DNS Zone to Azure and use Microsoft’s NameServers for this to work.


KB4048953 and KB4049065 fails to install (hungs). How to fix it.

We had a server which failed to install Windows Server / Windows 10 Service Update and November 2017 updates with the names KB4049065 and KB4048953 through Windows Update. The installation simply never completed and it looked like it hung.

Rather than go through all the various (failed) steps I did to troubleshoot it, I’ll just tell how to solve it.

  1. Start by downloading the packages from Microsoft Update Catalog to c:\temp;
    http://www.catalog.update.microsoft.com/Search.aspx?q=KB4049065 http://www.catalog.update.microsoft.com/Search.aspx?q=KB4048953 (Cumulative Update)
  2. Then expand the MSU files (using wusa.exe to install them failed for me) by doing this in a command prompt:
  3. You should now have two folders with files like this;
  4. As this is a Windows Server 2016 (or Windows 10) we can use Powershell rather than Dism to install the cab files into Windows.
  5. Open Powershell with elevated permissions (as Admin).
  6. To install both packages do this, and have patience. It took more than 4 hours for them to install on my server and it looked like the installation hung for a long time around 15%.
  7. When the installation has completed reboot the server and you are done!


Get GeoLocation with PowerShell and set NTP Server in a GPO

Using Powershell to locate your Geographical Location with the help of GeoLocation (IP-Address) is quite easy, cool and useful!

When we build Private and Hybrid Clouds across the globe in various countries and continents I want to make sure the Active Directory PDC Emulator is using a valid time source based on that location.

GeoLocation with Powershell

So with this small script (it’s using multiple WebServices to cycle through until it gets an answer) we can get a rough location for where we are and in my case it’s usually enough to know what country the datacenter is in.

That can then be used as you see fit. Though for me, I’m using it to update the Group Policy being applied to the PDC Emulator to point to the country specific NTP Pool with the generic pool as backup value.

That’s how easy it’s to modify a Group Policy object.

Please share any solutions using GeoLocation in the comments. It might give me some nice new ideas too!


How to delete files in a userprofile with Group Policy Preferences

As a follow up to my post about How to automatically Hide “Configure this local server” in Server Manager. I mentioned it’s possible to remove the individual user.config files in various ways to reset the behavior and hide the Welcome Tile. You can easily do that with a GPO like this;

Paths:

It’s a Group Policy being applied to all Server Admins utilizing Group Policy Preferences to delete two files (one for Windows Server 2012R2 and one for Windows Server 2016). But it’s only doing it once to make sure that if a admin does any changes to the file it won’t be deleted again. The idea is that it will be deleted once to reset settings to the one in ServerManager.exe.config but not repeatedly after that if the administrator saves any other changes.


How to automatically Hide “Configure this local server” in Server Manager

After you have installed a couple of hundred servers, you may start to feel that you have seen this text a couple of times too many and start to wonder how to get rid of it…

Hide Welcome Tile

You can obviously click the “Hide” button to hide the “Configure this local server” box, which is also called “Welcome Tile”.

Show Welcome Tile

And if you would ever want to get it back, you can find it in the “View Menu”. BUT… How do you disable the Welcome Tile by default for all users?

There is unfortunately no GPO (Group Policy) to control that. Just to set if Server Manager should auto-start or not. Which does not help in this case.

The settings in Server Manager is stored in a version folder in this location:

The configuration for Server Manager is stored in a file called user.config with the interesting bits highlighted here;

WelcomeTileVisibility

So you want to Modify the “WelcomeTileVisibility” setting in that file which can be done in numerous ways. But a easier solution is to just name and copy a file with this content to that folder.

user.config

That file only contains new default WelcomeTileVisibility setting, hiding the Welcome tile for you when you launch Server Manager. And if you do any changes in Server Manager, the new settings will be saved to that file too.

But that’s a per user setting and it has to be copied to the profile after it’s been created etc etc. Making it all a bit more complicated.
Luckily there is a better and easier way to do it, where you also help your co-workers at the same time!

In your reference image, or in your Server deployment script or with PowerShell or with Group Policies or any other way you find worthy. Just use the same information as above, but save it in this path to be machine wide;

Hide Welcome Tile for everyone

Notice that it’s still the exact same content of the file;

But it’s now stored together with the ServerManager.exe file in the system32 folder making it server wide. It’s a lot easier to copy it there just once so it’s applied to everyone rather than try to get the config file into each persons profile.

Notice: If you already have a user.config file in your Profile, it may override the settings from serverManager.exe.config so delete your user.config file to verify your new setup is working as expected.

In our environment, we are deploying the file in our Server Deployment solution, and also copying it to all server with a Group Policy Preference just in case someone installed a server manually for some unknown reason.


DVBLogic channel logos for Kodi

I’ve used Kodi (xbmc) as frontend for my DVBLogic (DVBLink) TV-Server backend. Which is working great, but I wanted to enhance the experience a bit and get channel logos for all my channels to show in the tv-listing and in EPG view.

There were unfortunately no packs of Swedish channel logos available, so I made a small powershell script that reads the channel logo URL’s from the EPG Guides and downloads them to a country specific folder. They can then be assigned in DVBLink to the right channels.

The part that took the longest to make was to find a way to download the latest Windows (Win32) version of XMLTV from Sourceforge.

The Script is Downloading Windows (Win32) version on XMLTV.exe from Sourceforge https://sourceforge.net/projects/xmltv/
It’s then unpacking the Zip file to a Directory in c:\temp\xmltv
It will run XMLTV.EXE with –configure where you will be prompted for a location of the cache and which Channels to download information for. Either manually select each channel you want logos for or select all.
XMLTV.EXE will in the next step download information to tvzon.xml. I’ve set the timespan to 0, to make the download size minimal. Meaning, if you want more EPG data, you may want to change “–days 0” to “–days 14”.
The Script is then rading tvzon.xml and downloads all Logos to a country specific folder, based on the filename.
You can now copy the folder structure into your DVBLink server installation under “Program Files (x86)\DVBLogic\DVBLink\share\channel_logos” and you can keep the folder structure.

Link if you just want to download my pack: https://www.dropbox.com/s/elmoomsiyahxc4q/SwedishChannelLogos.zip?dl=0


Enable driver verifier for all none-microsoft drivers with powershell

I’ve been doing some debugging for a customer, who has multiple industrial Client PC’s who are rebooting regularly. And to get more information in the memory dumps I had a need to configure the system to do a complete memory dump but also to enable extra verification of all drivers in the system to find the cause of the bluescreens.

Window has a built in tool called “Verifier” where you can enable extra checks on calls done by specific drivers. You generally don’t want to enable it on all drivers as that will slow down the system notable. And truthfully, the number of times it’s a Microsoft device driver who’s causing the issue is so small, because they check and stress test their drivers so much better than all the other vendors. Thus, it’s always better to enable the extra checks for all drivers, except the ones from Microsoft to start with.

As I didn’t want to run around to all the Client PC’s and configure verifier, I’ve made a small powershell script that reads the name of all none-microsoft drivers from the system and enabled verification for just those drivers. Which can then be execute in any number of ways.

It’s using both the Get-VMIObject and Get-WindowsDrivers to get a complete list of thirdparty drivers in the system. And it will also configure the system for a Complete Memory Dump.

Just to be safe, I’ve added /bootmode resetonbootfail so it will reset the verifier settings in case the system is bluescreening during boot due to verifier notificing a bad driver in the boot process.

Reboot the PC, get a big cold Coke and wait for the bluescreen to happen.

Addition to new-wifimac address script

A reader asked if there was a way to reset the mac-address to the original value after using my script to set a random MAC address. But also if it’s possible to schedule the script to run every XX minutes as the local coffee shop restricts internet access to 15 minutes per custo…ehh sorry, per MAC Address!

Here is a small function to reset the mac-address, by changing it to 00-00-00-00-00-00 windows will use the default hardware MAC Address of your card.

Regarding the automatic scheduling of the script. There are a couple of different ways to do that with pros and cons. It’s for example possible to start the script with Windows Task Scheduler ever X minute or let it automatically run, sleep for XX minutes and then execute again, over and over again until you stop it.

It’s even possible to have Windows Task Scheduler monitor the Event log for new Wifi Connections and if there is a connection to the Coffee House WiFi network, then start the script.

But for now, I’ve just added a very basic Loop, which you can add to the script and execute. It will generate a new random MAC Address every 13 minute (13*60 = 780 seconds) and do that 4 times before you have to restart it or you can just adjust the numbers.

Change MAC Address with PowerShell of a Wireless Adapter

As I mentioned in my post a week ago, I’m commuting each day and there is a 200MB Quota on the Wireless Network. Luckily it’s based on the MAC Address of the WiFi Card, so it’s quite easy to get another 200MB Quota if you want  😉

wifi1

Here is my small powershell script that automatically Releases the IP Address, set’s a new random MAC Address and Re-Connects to the SSID, all done in a second or two.
Yay! Another 200MB Quota to burn.


I’m using a Window 10 client with Hyper-V, and I’ve created a Virtual NIC for the WiFi adapter, that’s why it’s called ‘vEthernet (External Wi-Fi)’.  But you should be able to use the script with a normal WiFi Adapter too.

I’m using a Virtual WiFi Adapter, to be able to give my Virtual Machines access to internet also when I’m without a LAN.

Here is the script for creating a Virtual WiFi NIC;


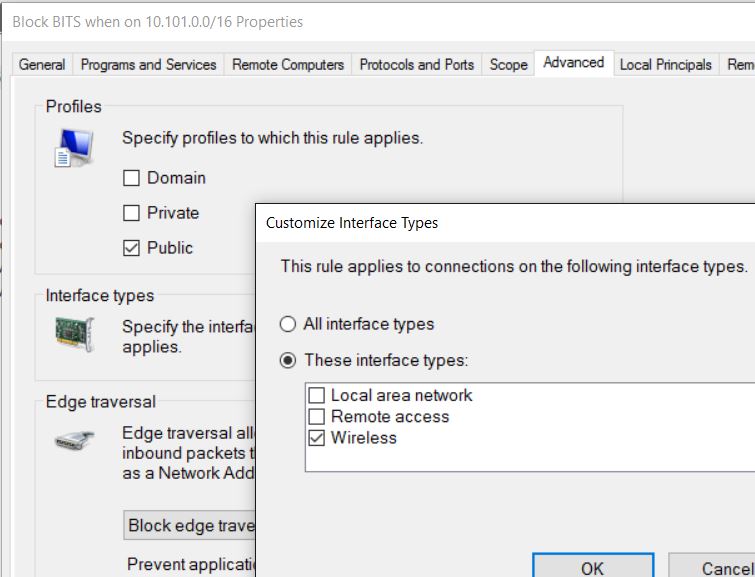
Block a Service (BITS) when on Wireless and specific Subnet

I’m commuting by train each day, working. The train has a free wireless network, but it’s limited to 200MB traffic, and is then reduced to snail speed. Luckily, it’s restricted by MAC-Address so it’s quite easy to get another 200MB when you run out 😉
Though, yesterday, I ran out of my 200MB quota in less than 7 minutes, which made me confused. A quick check confirmed what I suspected. Yepp, a new build of Windows 10 – fast ring is being downloaded and eating my quota.

Quick solution; create a Windows Firewall rule that blocks BITS from downloading stuff when on Wireless and using the trains subnet.

fw1

Here is the PowerShell syntax to create a similar rule.

Yay! No more problems with eating the quota while on the train.