# Author Markus Lassfolk @ TrueSec
# www.isolation.se
# with some 'inspiration' from other scripts.
#
# You need to have AzureRM modules installed to run this script
# https://docs.microsoft.com/en-us/powershell/azure/install-azurerm-ps
# install-module AzureRM
#
# Set your ZoneInfo and Azure settings
$ZoneName = "isolation.se"
$HostName = "home"
$azurelogin ="username@azureAD.onmicrosoft.com"
$azurepassword = "password"
$azureResourceGroup = "ResourceGroup"
# Don't modify below this
#
Import-Module AzureRM
Import-Module AzureRM.Dns
function get-myexternalip() {
$urls = "http://whatismyip.akamai.com",
"http://b10m.swal.org/cgi-bin/whatsmyip.cgi?just-ip",
"http://icanhazip.com",
"http://www.whatismyip.org/";
$RxIP = "(\d{1,3}\.\d{1,3}\.\d{1,3}\.\d{1,3})";
$ip = "Unknown";
Foreach ($address in $urls) {
try {
$temp = wget $address;
$www_content = $temp.Content;
if ( $www_content -match $RxIP ) {
$ip = ([regex]($rxip)).match($www_content).Value
break
}
} catch { continue }
}
return $ip
}
# Set the expected IP Address. Obtain this from a DNS query or set it statically.
$EI = [System.Net.Dns]::GetHostAddresses($HostName +"."+ $ZoneName) | Select-Object -ExpandProperty IPAddressToString
# Obtain the IP Address of the Internet connection.
$CheckNetwork = Test-NetConnection -CommonTCPPort HTTP freegeoip.net
if ($CheckNetwork.TcpTestSucceeded -eq $True) {
$ExternalIP = get-myexternalip
$IP = $ExternalIP
# If the external IP is not the same as for the HostName
If ($IP -ne $EI) {
$accountName = $azurelogin
$password = ConvertTo-SecureString $azurepassword -AsPlainText -Force
$credential = New-Object System.Management.Automation.PSCredential($accountName, $password)
# Login to Azure
Login-AzureRmAccount -Credential $credential
Select-AzureRmSubscription -SubscriptionObject $(Get-AzureRmSubscription)
# Set IP for the HostName
New-AzureRmDnsRecordSet -Name $HostName -RecordType A -ZoneName $ZoneName -ResourceGroupName $azureResourceGroup -Ttl 600 -DnsRecords (New-AzureRmDnsRecordConfig -IPv4Address "$($IP)") -Overwrite -Confirm:$false
}
Else {
Write-Output "Dynamic address ($IP) and DNS address ($EI) match."
}
}

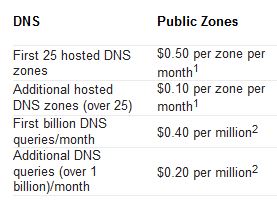 Free DNS Services for some time, but as they are getting harder and harder to use for free. Like you need to remember to logon and click a button once a month and what not. I figured it was time to migrate to Azure DNS instead. Being able to use PowerShell to handle my DNS together with everything I’ve already automated makes my life so much easier. And as I’ve already got a couple of domains and some Azure subscriptions there was more or less no increased cost for me. As you can see in the picture, Azure DNS Pricing is really cheap.