Notice: Function _load_textdomain_just_in_time was called incorrectly. Translation loading for the urvanov-syntax-highlighter domain was triggered too early. This is usually an indicator for some code in the plugin or theme running too early. Translations should be loaded at the init action or later. Please see Debugging in WordPress for more information. (This message was added in version 6.7.0.) in C:\home\site\wwwroot\wp-includes\functions.php on line 6114
Windows Server 2012 – A Geeks World

How to solve EVENT ID 1202 SceCli 0x57 Parameter is incorrect

Customer is repeatedly getting this Event ID on all Servers and Clients, especially on the Domain Controllers being logged every 5 minute.

Searching for that Error gives thousands of results, most less helpful.The way I solved this problem was like this.

  1. On one of the servers having the problem, run RSOP.MSC
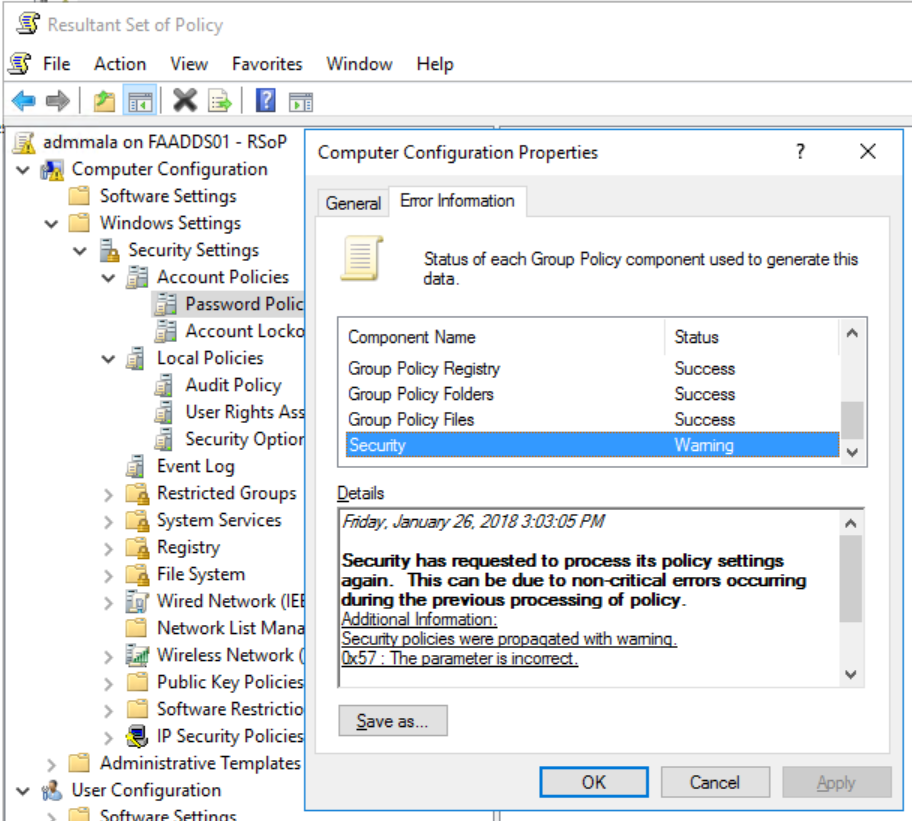
  2. Resultant Set of Policies showed a Warning on the Computer policies. Selecting properties there showed the same error as in our Event Log.
  3. Browsing the Tree showed that there were a problem in the Password Policy section, from the Default Domain Policy.
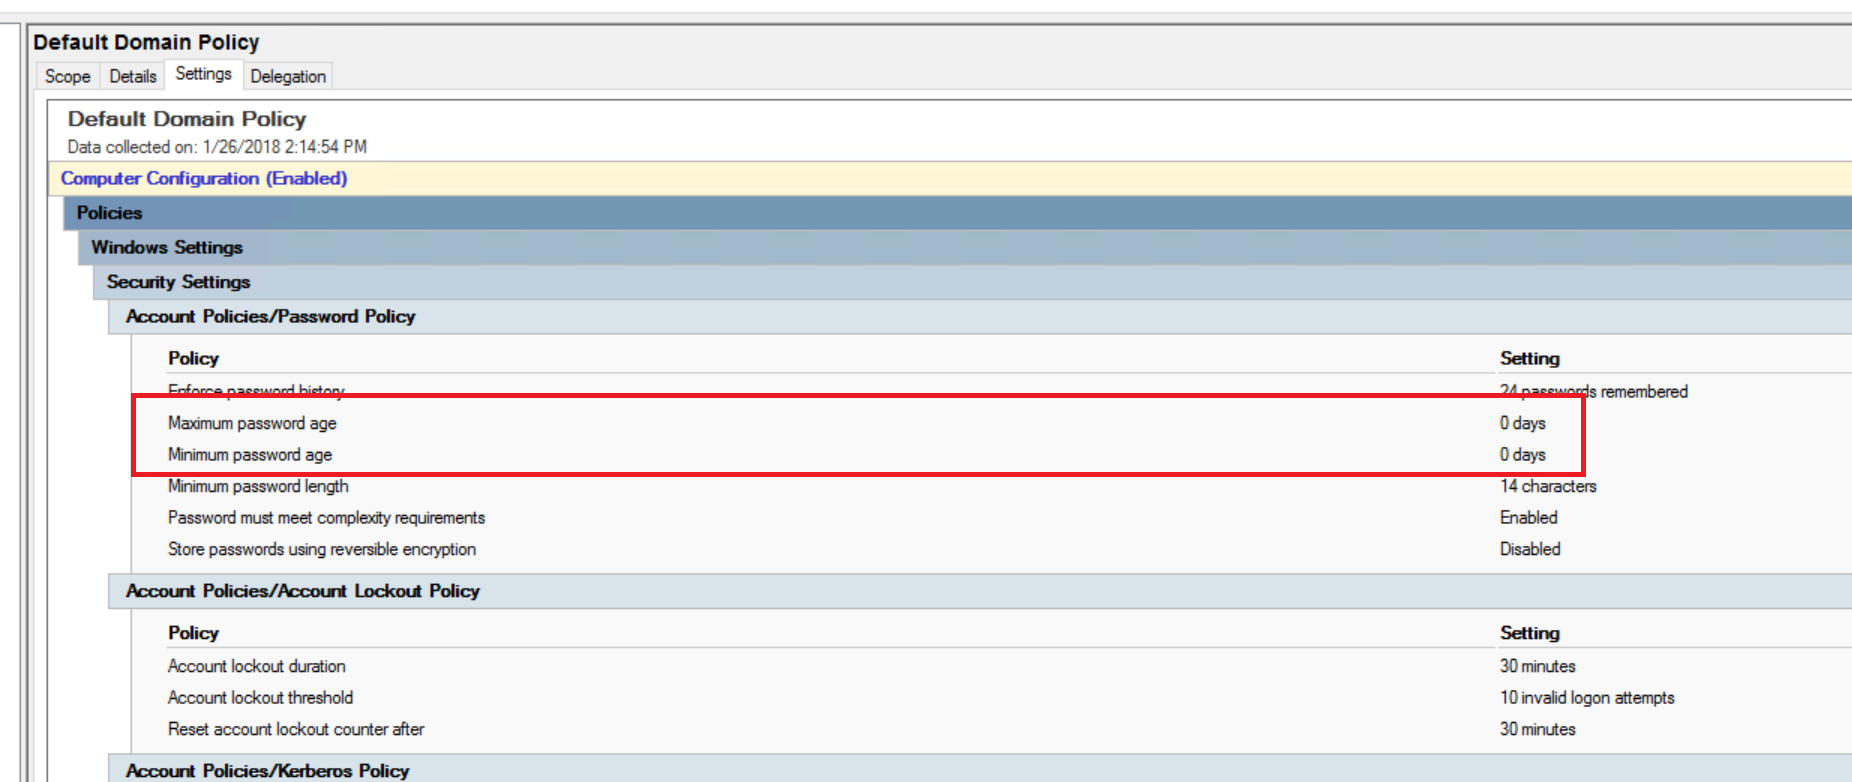
  4. Which were also visible in GPMC (Group Policy Management Console)
  5. By modifying the Default Domain Policy and fixing the bad entries (no clue how they got there). The Error message (and problem) is now gone.


How to automatically Hide “Configure this local server” in Server Manager

After you have installed a couple of hundred servers, you may start to feel that you have seen this text a couple of times too many and start to wonder how to get rid of it…

Hide Welcome Tile

You can obviously click the “Hide” button to hide the “Configure this local server” box, which is also called “Welcome Tile”.

Show Welcome Tile

And if you would ever want to get it back, you can find it in the “View Menu”. BUT… How do you disable the Welcome Tile by default for all users?

There is unfortunately no GPO (Group Policy) to control that. Just to set if Server Manager should auto-start or not. Which does not help in this case.

The settings in Server Manager is stored in a version folder in this location:

The configuration for Server Manager is stored in a file called user.config with the interesting bits highlighted here;

WelcomeTileVisibility

So you want to Modify the “WelcomeTileVisibility” setting in that file which can be done in numerous ways. But a easier solution is to just name and copy a file with this content to that folder.

user.config

That file only contains new default WelcomeTileVisibility setting, hiding the Welcome tile for you when you launch Server Manager. And if you do any changes in Server Manager, the new settings will be saved to that file too.

But that’s a per user setting and it has to be copied to the profile after it’s been created etc etc. Making it all a bit more complicated.
Luckily there is a better and easier way to do it, where you also help your co-workers at the same time!

In your reference image, or in your Server deployment script or with PowerShell or with Group Policies or any other way you find worthy. Just use the same information as above, but save it in this path to be machine wide;

Hide Welcome Tile for everyone

Notice that it’s still the exact same content of the file;

But it’s now stored together with the ServerManager.exe file in the system32 folder making it server wide. It’s a lot easier to copy it there just once so it’s applied to everyone rather than try to get the config file into each persons profile.

Notice: If you already have a user.config file in your Profile, it may override the settings from serverManager.exe.config so delete your user.config file to verify your new setup is working as expected.

In our environment, we are deploying the file in our Server Deployment solution, and also copying it to all server with a Group Policy Preference just in case someone installed a server manually for some unknown reason.


Enable driver verifier for all none-microsoft drivers with powershell

I’ve been doing some debugging for a customer, who has multiple industrial Client PC’s who are rebooting regularly. And to get more information in the memory dumps I had a need to configure the system to do a complete memory dump but also to enable extra verification of all drivers in the system to find the cause of the bluescreens.

Window has a built in tool called “Verifier” where you can enable extra checks on calls done by specific drivers. You generally don’t want to enable it on all drivers as that will slow down the system notable. And truthfully, the number of times it’s a Microsoft device driver who’s causing the issue is so small, because they check and stress test their drivers so much better than all the other vendors. Thus, it’s always better to enable the extra checks for all drivers, except the ones from Microsoft to start with.

As I didn’t want to run around to all the Client PC’s and configure verifier, I’ve made a small powershell script that reads the name of all none-microsoft drivers from the system and enabled verification for just those drivers. Which can then be execute in any number of ways.

It’s using both the Get-VMIObject and Get-WindowsDrivers to get a complete list of thirdparty drivers in the system. And it will also configure the system for a Complete Memory Dump.

Just to be safe, I’ve added /bootmode resetonbootfail so it will reset the verifier settings in case the system is bluescreening during boot due to verifier notificing a bad driver in the boot process.

Reboot the PC, get a big cold Coke and wait for the bluescreen to happen.

Recommended hotfixes for Windows Server

A great article listing all known issues and available hotfixes for Windows Server 2012 R2 Hyper-V Network Virtualization;

KB:2974503 – Recommended hotfixes, updates and known solutions for Windows Server 2012 and Windows Server 2012 R2 Hyper-V Network Virtualization (HNV) Environments
http://support.microsoft.com/kb/2974503/

Another fantastic source of information is Hyper-V.nu that always keeps a list to the latest updates for Windows Server (Cluster and Virtualization) here; http://www.hyper-v.nu/hotfixes/


Reduce DNS Client Cache in Windows Server 2012 R2

I’m often using Remote Desktop Gateways to connect to various environments, including our Private Cloud. One challenge arises when I change IP-address or network settings on a computer through SCVMM. As the RDGW has cached the DNS entry and IP Address, it takes a while until that information is cleared and I’m able to eastablish a connection. Or to be fair, what I usually do is RDP into the RDGW and does a “ipconfig /flushdns” and then reconnect the first server.
It does work, but wouldn’t it be better if that was kind of done automatically. Well, I guess you could schedule a “ipconfig /flushdns” every X minutes and get the desired result.

A better solution is to reduce the DNS Cache timeout on the RDGW server! I’ve modified mine to cache entries for just 10 seconds, and then do a new DNS query.  10 Seconds might be a bit too aggressive though it works fine for me.

HKEY_LOCAL_MACHINE\SYSTEM\CurrentControlSet\Services\Dnscache\Parameters  maxcacheTTL
HKLM\SYSTEM\CurrentControlSet\Services\Dnscache\Parameters
maxcacheTTL

Use this registry key to set the DNS Client Cache timeout;

Restart the “DNS Client” service to take effect. (net stop dnscache & net start dnscache).
I’ve only tried this on Windows Server 2012 R2, but I guess it should also work on Windows Server 2008, Windows Server 2008 R2 and Windows Server 2012.

Personally, I’ve set this key through Group Policy Preferences to make sure it’s always done, even if the RDGW Server is reinstalled.

The other two values; MaxCacheEntryTtlLimit and MaxNegativeCacheTtl are leftovers from my testing, it seems those values worked for “Windows 2000” and are not used anymore.


Azure Pack : Tenant Site automatic installation

If you want to install Azure Pack : Tenant Site in a distributed installation meaning not an Express installation on just one server. It’s possible to do it manually, OR … of course in a scripted way, so it’s automatic, scripted and unattended. Same result each time and smallest amount of time wasted on installations.  Here is a small powershell script that will take care of all the dependencies and install all the packages for the Public Tenant Site.


Can’t access a computer remotely without password?

I got a question the other day, “how can i access a computer remotely without a password?”

The reason that it’s by default is not possible to access a computer remotely with an account that does not have a password is because there is a new security policy/feature which states:

You can change that behavior by modifying the “Local Security Policy” here:

NoPassword


Just a thought. One could argue that it’s actually safer to have no password on the Local Admin account and leave this policy Enabled. Than have a weak password on the Admin account.

Because if there is no password, no malicious person or software could ever remotely access the computer as a local admin. While if you have a weak password, it would be possible for someone to brute force (try all possible combinations until you get in) the password.


Howto get NAP with Server and Domain Isolation to play together

If you are trying to get NAP (Network Access Protection) and SDI (Server & Domain Isolation) to play nice, you might not get the results you are expecting. I’m going to explain howto get NAP with Server and Domain Isolation to play together

There are plenty of Blogs and Guides out there, explaining how to get either NAP or Server and/or Domain Isolation to work. And that’s basically no problem so I won’t cover that here today.
But I’ve so far not found anyone who’s tried to combine both technologies.

Background

First of all, some background for my environment. I’m working on a project where we want to implement NAP to get the health check, but also Server and Domain Isolation to make sure that only trusted clients and users can talk to the systems they have access to. There was no doubt that we would use Certificates to validate the client health state.

NAP with Server and Domain Isolation PolicyTwo Windows Server 2008 R2 Servers with HRA/NAP Roles and the Stand-Alone CA Role were installed for redundancy. Clients are getting the Health Certificates and all is good. The SA (Security Associations) policy on the servers and clients is configured to “Require Inbound and Request Outbound Authentication”, with a requirement for a Health Certificate from the organizations CA Servers. So far, so good.

The clients can now access the server when they have a valid health state, and are unable to access the server if they don’t. Yay! NAP works.

And the nice thing is that since the HRA only serves Domain Joined clients. As the servers won’t talk to any client without a Health Certificate, and only Domain Joined client can get one, we have also got “Domain Isolation”. Ok, two out of three check boxes done.

Now, try to use Server Isolation and configure a Firewall Rule to only allow ClientA to talk to connect to ServerX via RDP. That does not work. Well, it does work to create the rule, but it will never allow the traffic.
The reason is that when you use a NAP Certificate to authenticate the connection, there is no mapping to the computer account. Which makes it impossible to use a Computer Based rule.

NAP with Server and Domain Isolation - Security Associations

Notice “No Authentication”.

Okay, so if you use the check box NAP with Server and Domain Isolation - Certificate Mapping“Enable certificate to account mapping”?

Sorry, that doesn’t work either. When you use the Health Certificate feature, no certificate mapping is done in the Windows Firewall. This has been verified in the Windows source code.

This blog post does state that it should be possible to use that check box and then use a Policy  “Access this computer from the network” where you can specify which computers are able to access the server over the network. But it’s still “All or nothing”. You can’t specify that ClientA should be able to access the SQL Server but nothing else.

Solution for NAP with Server and Domain Isolation

Luckily, there is a kind of workaround. To be honest, it’s not that common that you want to restrict so only ClientA, ClientB and ClientC can access the SQL Service on ServerX. I would dare to say its more common that you want to restrict which Users can access the service. Right?

I want to control so UserD, UserE and userF can access the RDP (Remote Desktop) Service, from any Health Domain Joined Client. It doesn’t really matter which client they connect from as long as it’s healthy and domain joined. Or I could control which clients they are able to logon to.

So by using a “Secondary Authentication” NAP with Server and Domain Isolation - Secondary Authenticationoption, where we Authenticate the User, like this.
Still the same options for the Computer Authentication. Just add a Secondary Authentication on the SA for User (Kerberos v5). It’s then possible to restrict which users are able to connect to a specific service.

In your firewall RDP Rule, configure it to Require a secure connection, and specify which users should be able to access the service. Now try to connect with two different users via RDP. You should see how the rule is applied and works.

I decided to create a Firewall Rule for RDP that only allowed “TestUser” to connect to the service.
In the screenshot below, the upper RDP is started with the TestUser Account, while the bottom RDP Client is started with “Runas Domain\Administrator” which according to the rule, should not be allowed to connect. And as you see, it’s not able to connect, which is expected.

NAP with Server and Domain Isolation - Proof that it works

Summary

To get NAP to work with Server Isolation, you have to enable “Second Authentication” for the User with Kerberos Authentication, so there is Authentication done when the connection is established. Which in turn makes it possible to create Firewall Rules that can be applied to User Object, unfortunately not to computer objects.


List computer certificates that will expire with Powershell

Just a small simple script that will list all Computer Cerificates that will expire in 90 days, to give you a heads up and time to renew them.

To list computer certificates that will expire in 90 days:

Just change “-lt 90” to some other value to adjust the expiry period.