Notice: Function _load_textdomain_just_in_time was called incorrectly. Translation loading for the urvanov-syntax-highlighter domain was triggered too early. This is usually an indicator for some code in the plugin or theme running too early. Translations should be loaded at the init action or later. Please see Debugging in WordPress for more information. (This message was added in version 6.7.0.) in C:\home\site\wwwroot\wp-includes\functions.php on line 6114
Markus Lassfolk – Page 3 – A Geeks World

Swedish Windows Azure Stack User Group

For my Swedish community members who’s interested in Microsoft Azure Stack. There is now a Swedish Windows Azure Stack User Group on Facebook, where we share knowledge, information and discuss everything around Microsoft Azure Stack and Windows Azure Pack.

Welcome to join! https://www.facebook.com/groups/MASUGSWE/


Addition to new-wifimac address script

A reader asked if there was a way to reset the mac-address to the original value after using my script to set a random MAC address. But also if it’s possible to schedule the script to run every XX minutes as the local coffee shop restricts internet access to 15 minutes per custo…ehh sorry, per MAC Address!

Here is a small function to reset the mac-address, by changing it to 00-00-00-00-00-00 windows will use the default hardware MAC Address of your card.

Regarding the automatic scheduling of the script. There are a couple of different ways to do that with pros and cons. It’s for example possible to start the script with Windows Task Scheduler ever X minute or let it automatically run, sleep for XX minutes and then execute again, over and over again until you stop it.

It’s even possible to have Windows Task Scheduler monitor the Event log for new Wifi Connections and if there is a connection to the Coffee House WiFi network, then start the script.

But for now, I’ve just added a very basic Loop, which you can add to the script and execute. It will generate a new random MAC Address every 13 minute (13*60 = 780 seconds) and do that 4 times before you have to restart it or you can just adjust the numbers.

Change MAC Address with PowerShell of a Wireless Adapter

As I mentioned in my post a week ago, I’m commuting each day and there is a 200MB Quota on the Wireless Network. Luckily it’s based on the MAC Address of the WiFi Card, so it’s quite easy to get another 200MB Quota if you want  😉

wifi1

Here is my small powershell script that automatically Releases the IP Address, set’s a new random MAC Address and Re-Connects to the SSID, all done in a second or two.
Yay! Another 200MB Quota to burn.


I’m using a Window 10 client with Hyper-V, and I’ve created a Virtual NIC for the WiFi adapter, that’s why it’s called ‘vEthernet (External Wi-Fi)’.  But you should be able to use the script with a normal WiFi Adapter too.

I’m using a Virtual WiFi Adapter, to be able to give my Virtual Machines access to internet also when I’m without a LAN.

Here is the script for creating a Virtual WiFi NIC;


Block a Service (BITS) when on Wireless and specific Subnet

I’m commuting by train each day, working. The train has a free wireless network, but it’s limited to 200MB traffic, and is then reduced to snail speed. Luckily, it’s restricted by MAC-Address so it’s quite easy to get another 200MB when you run out 😉
Though, yesterday, I ran out of my 200MB quota in less than 7 minutes, which made me confused. A quick check confirmed what I suspected. Yepp, a new build of Windows 10 – fast ring is being downloaded and eating my quota.

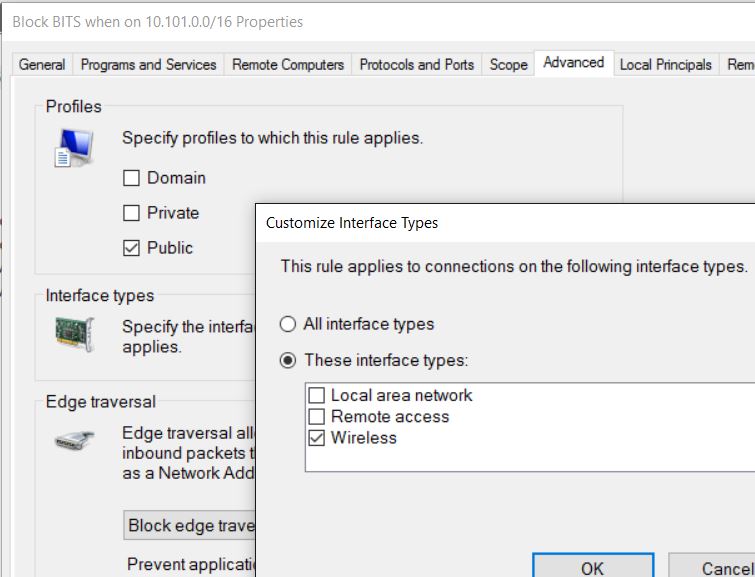
Quick solution; create a Windows Firewall rule that blocks BITS from downloading stuff when on Wireless and using the trains subnet.

fw1

Here is the PowerShell syntax to create a similar rule.

Yay! No more problems with eating the quota while on the train.

Should the image contain hotfixes or not?

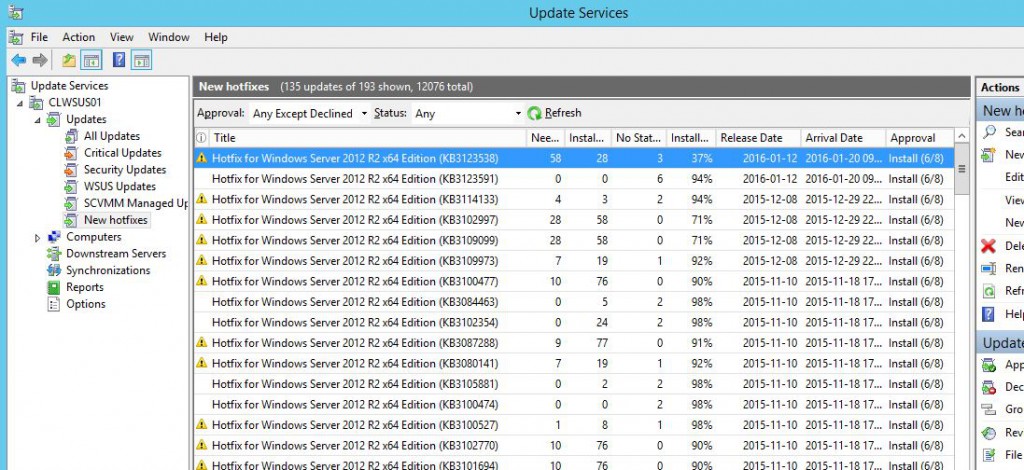
One more post in my WSUS/Hotfix series of blogposts. I’ve been asked a couple of times how we approve Hotfixes and if we include them in the images.

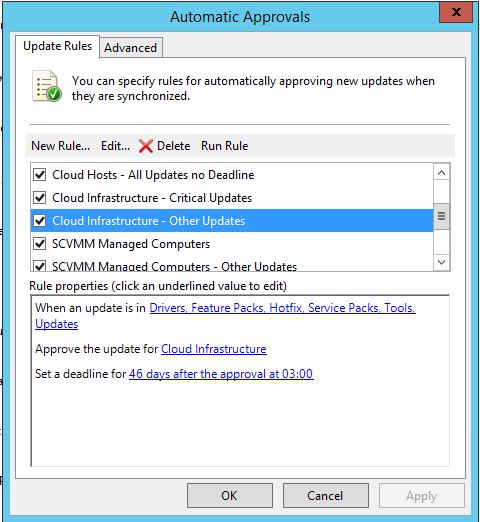
I’ve made an Autoapproval Rule where we approve all Hotfixes automatically to the various Computer Groups with a Deadline, like this.

wsus16

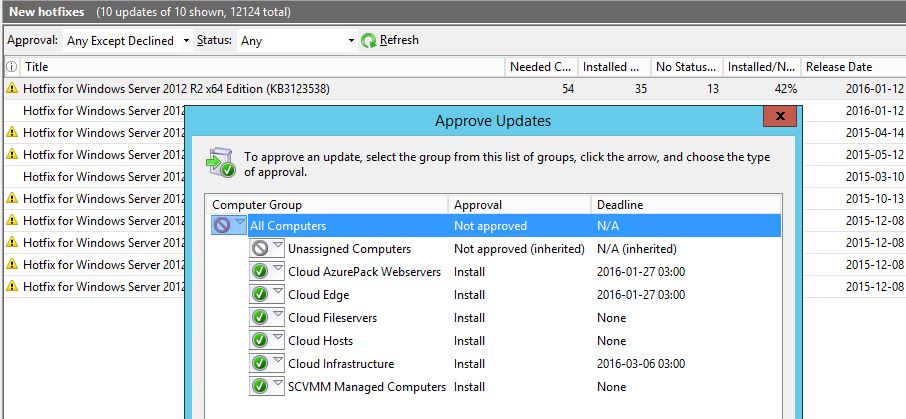
And this is how the details looks like;

wsus17

First of all, any server that could cause problems if it automatically rebooted doesn’t have a Deadline, thats servers like Hyper-V Hosts and SOFS Nodes. Those servers are managed by SCVMM’s (System Center Virtual Machine Manager) Patch Management. VMM has a feature to put a cluser node in maintenance mode, automatically drain the node of VM’s, patch it, and then bring the node back online again before it takes the next node.  So we handle all patching of clustered servers from SCVMM. While we let the WSUS Client handle all other servers. We might add SCCM to the mix some day and let it handle all of the servers, but as most of our customers don’t want to run SCCM to manage their Fabric, this is the way we do it now.

By putting a deadline, we know the hotfix will be installed sooner or later. And if there is a Patch Tuesday before that date, it will also install the hotfixes at the same time.

Notice that the hotfix is NOT approved for All Computers and NOT for Unassigned Computers. How come?

When we build a VM image for any OS, it’s done automatically through MDT. Those VM’s are ending up in Unassigned Computers as they don’t have a role yet and we don’t want any Hotfixes in the images. Of course, if there is a mandatory hotfix whish is needed to make the image or deploy it, that one will be included!

The reasons we don’t want any hotfixes in an image is quite simple if you think about it. There are two main reasons really.
The first one is that if we make an image in august, which contains hotfixes. When we deploy that image 3 months later, there is a big chance that the hotfix we had in the image is replaced by a proper update from Microsoft so there was no use for the hotfix in the first place.
Second, when we create an image, we don’t add Clustering, Hyper-V and other roles and features to the image, right? So Windows will then only install the hotfixes for the core OS. And when the image is later deployed and someone adds the Hyper-V Role, it would install hotfixes for that role then. So the server wouldn’t be fully patched anyway so adding 5 or 15 hotfixes automatically after deployment doesn’t really make much of a difference.
Third, a minor reason is also that we normally use the same images for Fabric, Workload and Tenants and we like to keep them quite generic.

Here is a great blogpost about making reference images from my colleague Mikael Nystrom.


Semi-Automatic Hotfix import into WSUS

One of my blogreaders, Andreas Fjellner, came up with a way to make the import of hotfixes a bit faster than copy and paste.

You can download a XML file with all the Hotfixes I’ve got imported so you don’t have to do a findstr or excel filtering from the previous blogpost, the XML file contains the same list as shown here List of Private Cloud related Hotfixes – 2016-02-03

Download: XML File (notice the Download button at the top so you don’t have to copy and paste). Save the file as c:\temp\details.xml on your WSUS Server and then run this script;

It will spawn one internet explorer for each Hotfix with the correct URL. Just click ADD to basket. Close the IE Window and pick the next window.
When you are done with the first batch of 20 hotfixes, use the “Import updates” link as described here: Importing Hotfixes and Drivers directly into WSUS and you will now be able to import all hotfixes into your WSUS. And now press Y in the powershell window to take the next batch of hotfixes. Repeat until done.

Another way is to use AutoIT to make a script that moves the mouse and clicks on the right place doing the import semi-automatic, as another blogreader pointed out. There is always a way!

Importing Hotfixes and Drivers directly into WSUS

I got a comment on my previous blogpost.

Could you please clarify the import bit with paste:ing the uri into Wsus IE.
If you paste the Uri into the address field it wants do dowload the update and not import it.

You are right, I was very unclear about that and should have explained it, thanks for asking Patrik.

This process can be used to import anything from the Microsoft Update Catalog, including Drivers and public Hotfixes.

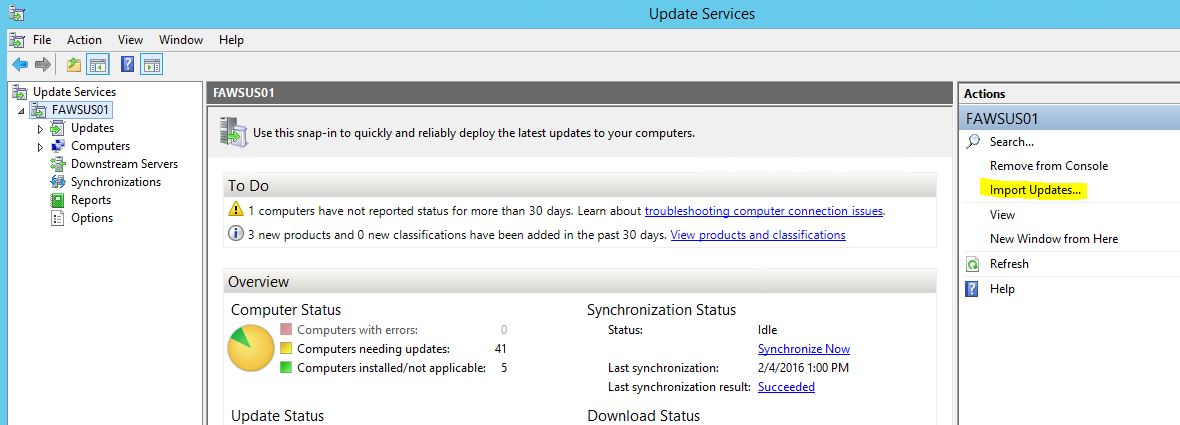
Start by opening your WSUS Console, and click on “Import Updates”.
It has to be done that way to get the “import” option, else you will only be able to download the files.

wsus10


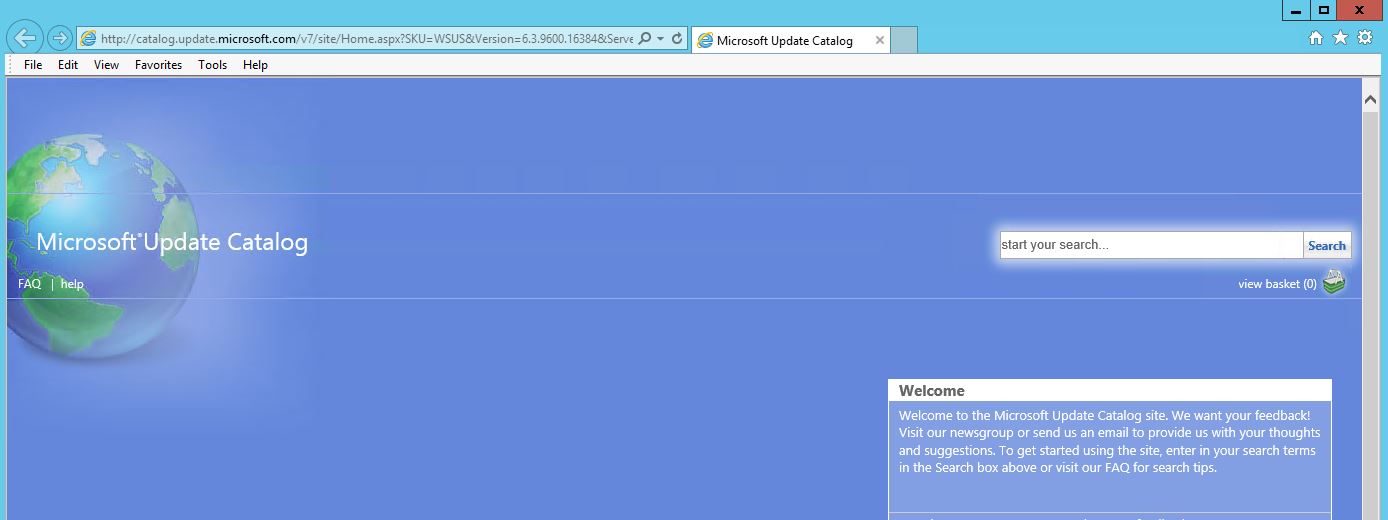
An normal Internet Explorer will now open. If this is the first time you are doing this, you will be prompted to approve an activex component and you may have to trust the updates website too.

wsus11


You can either search for hotfixes (or drivers) by their name, or just paste the MUUri that’s listed on each hotfix in my post here: http://www.isolation.se/list-of-private-cloud-related-hotfixes-2016-02-03/  And then click on Add to put the hotfixes in your basket.

wsus12


When you have added a couple of hotfixes to the basket click on “View Basket”. My experience is that adding too many hotfixes will make the Microsoft Update site timeout and be unresponsive. So I usually import the hotfixes or drivers in batches of 20-30 at the same time.

wsus13

Notice in the picture above, how there is no Import but just the normal Download button. If that happens, just switch back to the Windows Update Admin console, and click import updates again. A new tab will open in IE, it will remember all your items in the basket and a Import Directly into Windows Server Update Services checkbox exists now!

wsus14

Just import the hotfixes to WSUS that way, and approve them manually or make an Auto Approval Rule. Done!

The bad part, is as I mentioned in a previous blogpost, that you have to copy and paste each hotfix url into IE. I’ve not managed to figure out a way to script the import as it’s a ActiveX component doing all the work.


Live (VSM) migration fails with mirror operation failed and access is denied error

When doing a Live Migration from SCVMM (System Center Virtual Machine Manager) with VSM, moving a Virtual Machine from one Cluster to another Cluster and at the same time also to a new Storage Location, you are getting an error message similar to this:

The strange thing is that there is a destination folder in the new location, it’s just does not copy content to that folder and aborts with the Access Denied error. But If you shutdown the VM first, so it’ s just a migration over the Network, it works!

The solution is to give the SOURCE Cluster Write Access on the DESTINATION Storage. When you do a VSM Migration, the destination Hyper-V host, creates the Directory on the SOFS Node, but it’s the Hyper-V Host that owns the VM that copies the VHD’s files to the destination storage. And as the current owner, by default does not have access to write there, it will fail. One could think that VMM should grant permissions to a host when VMM knows that the host needs to write in the location?

Maybe it’s fixed in the next version, but until then, there are two ways to do this.
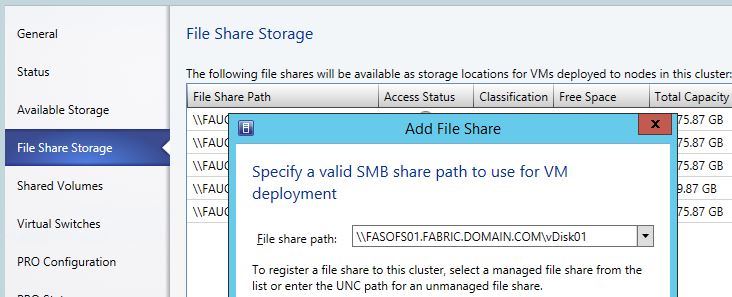
Solution 1) In VMM add the Destination SOFS Shares as Storage on the Source VM Hosts like this. That will make VMM add the VM Hosts with Modify Permissions in the SOFS Shares so it can write there.

sofs2

This works quite fine, if the Hyper-V Clusters and all Storage is located in roughly the same location. But if you have one compute cluster with storage in one location, and another compute cluster with storage in another location. There is then a risk that you may be running VM’s cross the WAN link.

Solution 2) This is the one we used. By not using VMM to grant permissions to the shares, but rather do it manually we achieve the same solution as above but with the added benefit that a new VM will always be provisioned on the local storage and there is no (or a lot less) risk of running a VM cross the WAN link. Yes, it’s still technically possible to do it, but no one will by accident provision a VM that uses storage in the other datacenter.

You can either add each node manually, so we have created a “Domain Servers Hyper-V Hosts” security Group in AD where we add ALL Hyper-V hosts to during deployment. And then added that group to the Share and NTFS Permissions. All Hyper-V hosts will then automatically have write access to all locations they may need.

I wrote these two short scripts to query the VMM Database for the available SOFS Nodes and use powershell to grant permissions to the share, and to NTFS.

As all our SOFS Shares were called vDiskXX or CSVXX (where XX is a number) I just used a vDisk* and CSV* to do the change on all those shares. You might have to modify it a little to suit your name standard.

Updated Script (2016-02-04):
I got a report that the script was getting an error on some servers, which I managed to reproduce. Here is an alternative version where it will connect to the server and execute the ACL change locally via invoke-command. It’s also only changing permissions on Continuously Available (SOFS) shares.


List of Private Cloud related Hotfixes – 2016-02-03

I’ve posted my list of resources for finding Hotfixes previously here.  And this is a list of hotfixes we’ve imported in our WSUS server for our and our customers Private Clouds.
I usually want to install a hotfix to avoid getting a known problem, than try to find a solution to a problem after it has already happened and affected the users and customers.

wsus3

I’ve used the script I posted here to make the list. I’m sorry for the format below, but there is no good way to extract the info from WSUS and as I don’t really know if anyone is interested in this besides myself, I won’t spend hours on fixing a nice output right now or I would never get this blogpost published.  Sorry!

I’m using the MUUri to paste into the WSUS IE to search and locate the hotfixes fast, instead of manually search for each. There is unfortunately no way to script the import according to Microsoft PM’s, so it has to be done manually. Sigh…

Continue reading “List of Private Cloud related Hotfixes – 2016-02-03”

Export information from WSUS about Hotfixes or Updates

I want to export information about all our Hotfixes in our WSUS Server, to share with the community as it’s sometimes hard to find up to date info of which hotfixes to apply in an environment.

Here is a quick and dirty script. No, scratch that, it’s not quick in any way but very dirty. The problem is that the WSUS Database does not contain the Description or Title of a Hotfix, so it’s not possible to export that info. Thus, I’ve to use a scripted Internet Explorer, to navigate to the URL of each Hotfix and grab the Title. Which makes the process veeeeeeery slow but I’ve been unable to come up with any better solution than that.

This is how the output looks like:

wsus2

And here is the full script, I will be really grateful if you share any changes you do as I’m sure there is a lot of ways to improve this script.