Notice: Function _load_textdomain_just_in_time was called incorrectly. Translation loading for the urvanov-syntax-highlighter domain was triggered too early. This is usually an indicator for some code in the plugin or theme running too early. Translations should be loaded at the init action or later. Please see Debugging in WordPress for more information. (This message was added in version 6.7.0.) in C:\home\site\wwwroot\wp-includes\functions.php on line 6114
Markus Lassfolk – Page 6 – A Geeks World

Update VMM Agent via PowerShell

PowerShell script to update VMM Agent on all VMM Managed Computers after Update Rollup is installed on VMM Server.

You can find the AgentVersion here: http://social.technet.microsoft.com/wiki/contents/articles/15361.list-of-build-numbers-for-system-center-virtual-machine-manager-vmm.aspx


Unable to Connect to VMM in AzurePack after UR install

After upgrading to Update Release 6 (UR6) we got the same issue as seen in earlier UR’s. It’s not possible to connect to VMM in AzurePack so you can’t see your Virtual Machines, Clouds or Networks.

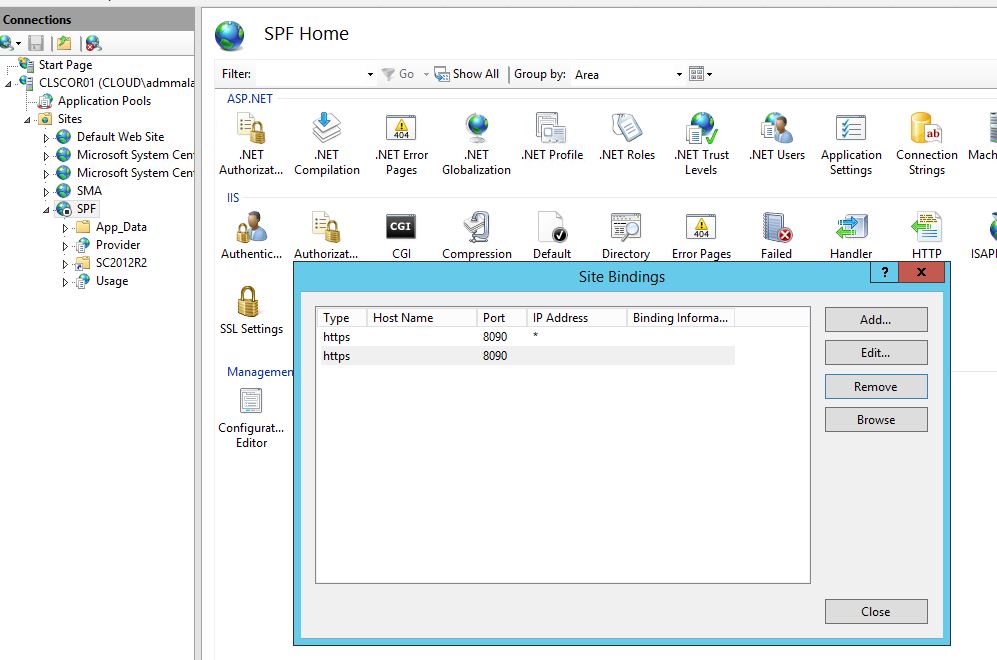
It turned out that when UR6 gets applied to SPF, the bindings are once again messed up. To fix this, just logon to the server hosting SPF and in IIS check the bindings as seen here;

SPF1

The SPF Website is not running and you can see two Bindings.
In my case, one has a certificate and the other doesn’t. So I just remove the binding without a certificate. Then start the Website and everything is working as expected again.

In earlier UR’s I’ve also seen how there is no bindings at all listed here. So you may have to create some binding then.


The request size exceeded the configured MaxEnvelopeSize quota

Today when I was updating our AzurePack WebSites Servers, I got an error which prevented the upgrade of most of the WebSite Roles like these;
Management Servers, Publishing Servers, Front End Servers and all the Web Workers. Yes, everyone except the Web Sites Controller.
Resulting in some unexpected downtime.  Luckily, all that was affected was this blogsite.

The error message I got was;
The WinRM client sent a request to the remote WS-Management service and was notified that the request size exceeded the configured MaxEnvelopeSize quota.
And I could also see that the files being copied to c:\windows\temp (WebFarmAgent.msi) were broken.

I also had an error “Failed to copy role artifacts to agent” in the logfile seen on Windows Azure Pack Websites Controller.

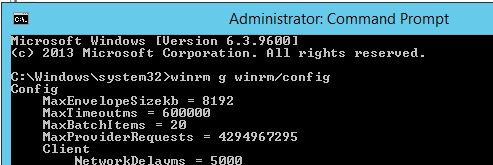
First of all, I ran this command in an Elevated Command prompt on the server hosting the Controller Role;
C:\Windows\system32>winrm g winrm/config

winrm1

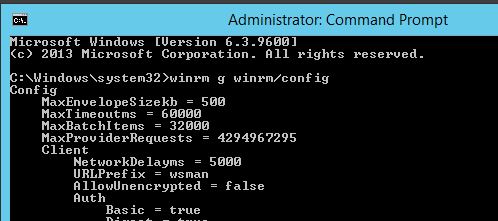
And then the same command on one of the failing servers;
C:\Windows\system32>winrm g winrm/config

winrm2

Notice the difference in MaxEnvelopeSizekb between the servers. One of the other servers had MaxEnvelopeSizeKB set to 700.

I don’t know why it’s different between the servers or what has suddenly changed it, my guess it’s some Windows Update patch. Though it’s the same patches being installed on all the servers, and I’ve seen three different values. Wicked.
So by using the same value on all the servers I got the setup to work. And as you can see, this blog site is now also running. YAY!

I chose to set the value to the same as on the Controller Server which is the one trying to run the commands and copy the files to the other servers.
winrm set winrm/config @{MaxEnvelopeSizekb=”8192″}
It will now take 5-60 minutes for all update and repair jobs to complete.

I couldn’t find any Group Policy object to use to set that value as a default value on all AzurePack WebSites servers. So I’ve got to come up with another longterm solution. Maybe doing it with Desire State Configuration (DSC) or via Configuration Manager?

Storage Spaces Deep Dive on Microsoft Virtual Academy

I’ve together with my colleague Mikael Nyström (www.deploymentbunny.com) and Ola Skoog (@ITPrOla) from Microsoft, recorded 4 sessions about Microsoft Storage Spaces at Microsoft Virtual Academy called “Storage Spaces Deep Dive“.
The sessions are focusing on Design, Best Practices, Performance and Troubleshooting.

Feel free to contact me (markus.lassfolk at truesec.se) if you have any questions about Storage Spaces.

Update AD-Users with new Phone-number and Pager via Powershell

Had a quick question from a customer about how one can automatically update the phone number and pager of a lot of AD users. The customer was changing switchboard and had to add 1 number in front of the current number.  Adding it in the middle of the string is also possible, but slightly more complicated as you have to split the string.

This is possible to do in a few different ways, but I chose the quickest way for me, via Powershell.

End Result:

aduser


MSTSC and RDCMAN Crashing?

For the last 3 days we have had issues connecting with RDP through our Remote Desktop Gateway. I’ve used both RDCMAN (Remote Desktop Connection Manager) and plain MSTSC where it’s crashing. It’s been happening quite regularly with the latest build (10041) of Windows 10 but also with a Windows 8.1 client.

In my case it’s sometimes been possible to connect to some of the servers but not others. And I’ve at times been able to stay connected for shorter periods (5-30 sec) before the client crashed.

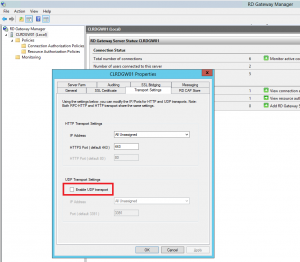
I did a quick usermode debug of the crashing application and found out that in both cases it’s a DLL file for MSTSC that’s causing the problem and it’s related to UDP Traffic.

Disabling UDP in the Remote Desktop Gateway seems to solve the problem short term. I’ll have to look into it more in depth later on, but for now I’m at least able to keep on working.

RDP Connection Crashing


How to setup a virtual DD-WRT Router with Hyper-V

I described in my previous blog port, some NAT issues I had with using more than one xbox one in our network, especially with xbox live party chat in Destiny (and with fireteams), here: How to use multiple xbox one consoles in a network.
As my router didn’t fully support UPnP my options were to buy a new one or try to flash it with for example a DD-WRT firmware which others had confirmed mostly worked fine, depending on build. DD-WRT is an alternative firmware which gives additional features to your router.
The older router I wanted to flash didn’t support DD-WRT and I didn’t want to risk screwing up my “in production” router. So I decided to setup a virtual DD-WRT and when it was operational, replace my current router. And that worked like a charm!

Pre-Requisits:
  • A computer with 2 Network cards.
  • Some kind of virtualization software. You can use OpenBox or VMWare if you like, there are guides on internet on how to use those, in my case I’m using Microsoft Hyper-V which is part of Windows Server 2008 and later, but also in Windows 8, 8.1 (Pro and Enterprise) and Windows 10 (as of this writing, currently in Tech-preview).
  • Possibility to connect that computer directly into the ADSL Modem. Or to take the RJ45 (Ethernet cable) you get from your ISP into that computer.
  • No other NAT device in front of your new virtual router.

I had previously called my ISP and asked them to disable the Router (enable pass-through) in the ADSL Modem, so I could use my own equipment. You may have to do that too, depending on the setup.
You can verify this by connecting your computer into the ADSL Modem and see if you get a real external IP-address from any of the ports (in my modem it’s only port 4 which gives this). If the IP you get is part of these series, you’ll need to call your ISP.
10.0.0.0 – 10.255.255.255
172.16.0.0 – 172.31.255.255
192.168.0.0 – 192.168.255.255

Setup:

For now, leave your current router in place and make sure you have internet access as usual as we will need to download some things and it’s good to know that it did work before we started messing around  😉

I’m using a Windows Server 2012 R2 for this (as I had one running), but it’s exactly the same steps doing it on Windows 8.1.

To enable Hyper‑V on Windows 8.1
  1. In Control Panel, tap or click Programs, and then tap or click Programs and Features.

  2. Tap or click Turn Windows Features on or off.

  3. Select Hyper‑V, tap or click OK, and then tap or click Close.

  4. Shut down your PC, and then restart it.

Setup your Virtual Network

Start the Hyper-V Administration Tool called Hyper-V Manager.upnp2  You will need to create two virtual networks, so click “Virtual Switch Manager”.
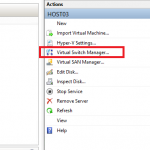
Then create two “New virtual network switches”. That makes it possible for your DD-WRT router to access the network.


We will need one network called for example; Local Areaupnp3 Network which looks like this. Connect that Virtual Network to the Network Card which is used by your computer today to access your Network.
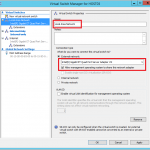
Notice that “Allow management operating system to share this network adapter” is enabled on the one called “Local Area Network”. That makes it possible for your computer to use this network which is a good thing.


The second switch can be called for example; Internet. And it upnp4should be bound to the other network card, which was previously unused.
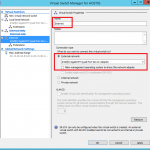
Make note that this should NOT have “allow management operating system to share this network adapter” checked.

We don’t want our host computer to use this network directly, or it might be the one that get’s the IP address from your ISP instead of our new virtual router. Right!

If you have done everything right so far, you should still be able to access internet from your computer.

Downloading

We will of course need to download DD-WRT, but also a tool to extract DD-WRT onto a virtual harddrive.

As of this writing, the latest version of DD-WRT available for x86 (virtualization) is a Beta from 2014-06-23 (the stable is from 2008, so I went for the Beta version).
You can download it here: ftp://ftp.dd-wrt.com/betas/2014/06-23-2014-r24461/x86_64/dd-wrt_public_vga.image
There are Full versions but you need to pay to use them, while the Public versions are free and will work in your home.

Download that image to your local harddrive and then also download this tool physdiskwrite to the same location. Which makes it possible to apply your image file onto a harddrive, we will get back to that in a minute.

Create a Virtual Machine

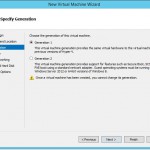
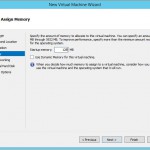
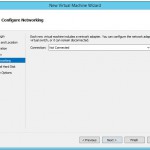
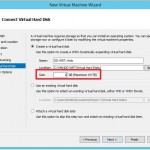
In Hyper-V manager, create a new virtual machine with these settings.
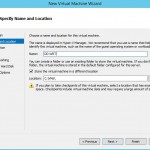
ddwrt1  ddwrt2  ddwrt3
ddwrt4
  ddwrt5 ddwrt6

Give it about 64-128mb of RAM. Don’t connect it to a network.
Give it a 1GB harddrive, which is enough and won’t give you a warning later on.
Don’t install a operating system, and click Finish.

Now open Settings for your newly created virtual machine.ddwrt7 We will need to replace the Network card.
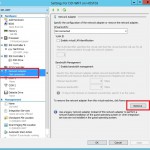
Select the existing card and then click Remove.

The reason is that DD-WRT does not have any built in drivers for this card, so we will use a Legacy card instead.

Now click on “Add Hardware” and choose to add a ddwrt8“Legacy Network Adapter” twice, so you get two Legacy Network Adapters like this.
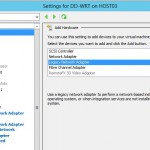
And also click on each of those cards and connect them to a virtual switch.
It’s very important that you connect the first (upper) card to the switch called (if you named them like me) “Internet” and the second to the one called “Local Area Network” so it looks like in the screenshot.

While you are at it, you can also give the Virtual Machine one additional Processor if you want to.

Preparing the Hard disk

We will now apply the image we downloaded to the virtual harddisk you just created.

  1. Open Disk Management. Right click on the diskmanage1Start button and choose “Disk Management”
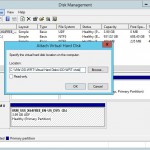
  2. Click Action, and then “Attach VHD”
  3. Browse to your Virtual Harddisk you created in the Wizard, in my case it’s “C:\VMs\DD-WRT\Virtual Hard Disks\DD-WRT.vhdx”
  4. Click OK

If that failed, and the error was that the file is in use. I guess you were a bit eager and started your virtual machine? In that case, stop the VM and retry this step.

Now open a Command Prompt with administrative rights and navigate to where you downloaded physdiskwrite and your DD-WRT image.

Then type; diskmanage2physdiskwrite.exe dd-wrt_public_vga.image
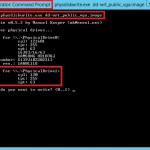
It should look something like in the picture to the right.

Important! If you pick the wrong drive here, that drive will be erased so you will loose all your files on that drive.

Normally Drive0 is the one your Operating System is installed on and it will probably have a Model and other information.
if you created a 1GB small drive just like I did, it should be easy to see which one that is by the lack of information and the “cyl, tpc and spt” should be about the same as in the picture.
Press the corresponding drive number. In my case, 1. And then Y to Proceed.

Go back to Disk Management console and in Actions menu, diskmanage3choose rescan. You should now see some partitions and information on the disk.
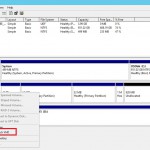
Right click on your drive (on the left hand where it says 1.00GB, and choose “Detach VHD”.


Booting

All done! Now in Hyper-V manager, start your virtual DD-WRT Router, and it should boot like this. boot1
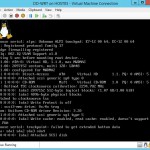
You can now access your new DD-WRT Router and configure it by using a web browser and navigate to http://192.168.1.1
You will be prompted to set a new Admin username and Password. Obviously, if your old router is using 192.168.1.1 you may have to turn that one off before you can access the new one.

Configuration

There are tons of guides on how to configure a DD-WRT Router, so I won’t go into details on that.

When you are done configuring the router, just change the network cable from your current router, into your computer and it will get a IP Address from your ISP and all clients will use that router instead.
It might take a while for your ISP to give you a new IP address, and if your old routers MAC Address is registered at the ISP you may have to call them and have them update their records.

A word of advice, configure your new DD-WRT router, to use the same Local Area Network IP-Address as your old router had. For example, if the old router had 192.168.0.1 then let the new router use the same, that will make transition smoother for your devices as they won’t have to get a new DHCP Address with the new routers information.

How about Wireless?

In this solution, I’m not using Wireless at all. I’m using another solution for Wireless though Unifi, or would use my old Wifi Router for just Wireless and connect it through the DD-WRT router like any other device.

 

How to use multiple xbox one consoles in a network

Last week, we bought a second xbox one console to our home so both me and my son could play Destiny together. That’s a great game by the way, I would say it’s worth to buy a xbox one just for that game alone.
Playing the game worked fine, but when we tried to use Voice Chat. We are in different part of the castle, ehhh mansion, ok…house! I’m upstairs in my cave and he’s downstairs in his lair and to not make the wife crazy with yelling to each other, we are forced to use xbox party chat.  Voice chat worked for a while and then stopped. Reforming the party made it work again for a couple of minutes and then the voice part stopped working. A bit annoying as it always worked until it was about time for a boss fight, so not really time to start fiddling with the party settings at that time.

We had not had this issue with our xbox 360 consoles, so something was different with Live on xbox one in regards to networking. A quick check on internet showed that this was a common problem from a lot of people trying to use two or more xboxes on the same network. With as usual, a million different ways to eventually solve it, including standing on your head and count to ten while you eat a raw egg which had solve it for some dude, or not.

First of all, the problem is NAT.
You only have one external internet address, that you got from your ISP. So all devices on the inside shares that external ip when they access internet through your modem or router (depending if you use ADSL or Fiber).
When two xboxes tries to talk to each other they use specific ports to do that on. And if those ports are not open, they can’t communicate. Also, one port can only be used by one xbox at a time. On the xboxes, open Settings and then Network, it will show you what kind of NAT settings the xbox has detected.
NAT: Open is the best one and you should be good to go!
NAT: Moderate  is quite good and will work in most cases.
NAT: Strict will give you headache, that’s what we had on both xboxes.

As mentioned above, xbox live uses specific ports (plus games use their owns too) and those ports needs to be opened and forwarded to your xbox. Well, Port Forwarding works fine when you have just one xbox. Because you can’t forward the same port to two destinations, it’s a 1-to-1 relationship. If you do setup Port Forwarding, you may get one of the xboxes to work fine, but the other will have issues with voice chat and playing games with others.

The solution to the whole problem is to use something called UPnP.

Universal Plug and Play (UPnP) is a set of networking protocols that permits networked devices, such as personal computers, printers, Internet gateways, Wi-Fi access points and mobile devices to seamlessly discover each other’s presence on the network and establish functional network services for data sharing, communications, and entertainment. UPnP is intended primarily for residential networks without enterprise-class devices.

I wish things were that easy….
UPnP will let the console and other devices ask the router to open specific ports for them, something like;
– Hi mr router, I’m xbox1 on IP address 192.168.0.100 could you send everything on port 12345/TCP to me please.
– Sure xbox1, that port is not in use so I will send everything on port 12345/TCP to 192.168.0.100.
– Thanks!

For that to work, the router has to have support for UPnP, which most network devices you use at home does have support for. Though, I’ll get back to some limitations with that in just a bit.
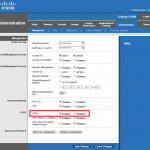
Obviously, UPnP has to be enabled in the router settings. upnp1On my Cisco Linksys E4200 it’s done in the Administration and then Management page. But it could of course be in other places too, I think one of the more common places is around “Application & Gaming” settings.

On my previous router, to get UPnP to work, it was the one who had to handle all IP-addresses. When my other DHCP server offered IP-addresses, or a computer had a static IP it couldn’t use UPnP.
I guess that’s not an issue in most residential environments, it’s just myself and my fellow geeks who use another DHCP server at home who runs into issues like that.
Though in the solution I’ll describe below that’s not a requirement anymore. I could see how my computer with a static IP-address made some UPnP mappings.

I had enabled UPnP in our router in the past so it was enabled, and we didn’t have any port forwarding conflicting with the xbox live ports. But were still getting NAT: Restricted on both xboxes. A bit of searching on internet revealed that there seems to be a lot of routers with a poor implementation of UPnP which makes them unfit for this.
I guess my Linksys is one of those. As it worked fine with xbox 360 but not with xbox one.
I did find some poorly maintained list with routers that others had confirmed works with multiple xboxes, in case you want to see what they say about your model or want to make sure the new on you are looking at will work, have a look here.

One additional thing you may want to look into. I’ve not confirmed this myself at the time of writing. But it seems that your xbox only does the UPnP request for some of the needed ports upon start, and the rest later on when needed. So if you have power setting: connected standby (fast boot) it will not re-open those ports when it wakes. Our boxes are in the power save state, so it’s not an issue for us. And I hope Microsoft fixes that issue if it’s for real.
Some routers have support for showing the UPnP Port mappings so you can verify that it’s working, mine did not.

Anyway, to sum it up.
To use just one console in the network it’s possible to use either UPnP or manual Port forwarding of all the necessary ports to your consoles IP-address.
But if you have two consoles or more you will have to use UPnP (and remove any of the previous port forwarding rules you have in place that can conflict). Make sure your router has full UPnP support, and see if the issue still exist if you use power save mode.

If you still have a problem, these are of your options, and what I did:
Buy a new router which you confirm before that it has support for multiple xboxes. Search internet for the make and model (and version, v2 etc) and see if others have confirmed it works. Don’t ask the sales guy!

Upgrade your current router with a third-party firmware. For example, it’s possible to “rebrand” my Linksys E4200 router with the DD-WRT firmware to get new features, functionality and hopefully working UPnP.
It might sound scary and it’s nothing I would recommend my grandma to do, but if you just follow the instructions carefully it’s not that hard. Though if you don’t follow the instructions, you may end up with a dead (bricked) router so be careful.
To find out if you can upgrade your router, just use the DD-WRT Router Database here.
If your router is not supported by DD-WRT, it’s also possible to use a similar firmware from other projects called Tomato or Open-WRT.

In my case, I didn’t want to fiddle with the Cisco Linksys router. So I looked into upgrading our old Netgear WNR2000 (v1) which turned out was not supported by DD-WRT.
But I found out it’s possible to setup a virtual DD-WRT to replace the Cisco box! Which is exactly what I did. More on that in the next blog post, called: How to setup a DD-WRT Router with Hyper-V.

Updating SCVMM DHCP Server Agent for Update Rollup 3 with Powershell

I’ve been to a couple of customers in the past month who has applied Update Rollup 3 for System Center 2012 R2 Virtual Machine Manager, through WSUS, but didn’t read the fine print.

ur3

So I wrote a quick script to locate all Hyper-V Hosts with the old/incorrect version.

And the next step was obviously, how to update the agent on all the Hyper-V hosts remotely and automatically!
There are a couple of different ways to do this, let me go through a couple of them.

One of the easiest ways is to use Sysinternals PSExec, just run psexec against those servers and execute uninstall of the old and installation of the new agent. In my humble opinion, it’s too much manual work to do it this way with a lot of hosts. So I rather use Powershell.

Looking at the above Powershell example, you almost have a full script for doing the rest.
Have a look at this;

Word of warning, the above script should be considered a “proof of concept” or give you a rough idea of how to do it. I’ve run it once, and it did work so it will hopefully work for you too.

There is a minor problem with the above solution. That script will do something called a “double hop”. It’s when you run something on Computer A, which gets executed on Computer B which in turn tries to connect to Computer C and use the credentials provided in A. Two hops, aka double hop.
In the above script, it’s when it’s accessing the install files from a remote share.
And to solve that problem you have to enable something you might have heard about, called Kerberos Constraint Delegation on all Hyper-V hosts (or other servers you want to double hop via).
In most environments KCD is not enabled, so the above script would not work to 100%. In fact, the uninstall would work, but not the installation so would will end up with a server that’s missing the DHCP Agent.
In case you ran the script without reading this part or before adding KCD, I added a small safeguard against that by doing a Test-Path before uninstalling the agent which probably told you it failed.

My good friend and college Mikael Nyström wrote a great blog post here recently on how to rather utilize CredSSP instead of using KCD for tasks like this.

And here is a slightly modified script using CredSSP instead of KCD.

Word of warning, the above script should be considered a “proof of concept” or give you a rough idea of how to do it. I’ve run it once, and it did break anything in that environment, so it might work for you too.

Basically, the script will enable CredSSP on the computer you run it on, and allow the credentials to be used on all remote servers that’s part of your domain. It will then connect to all Hyper-V hosts known by SCVMM and enable those as Credential Receivers.
Following that part, it will once again connect to those servers and check if the SCVMM DHCP Agent is outdated and if it’s able to connect to the install location (SCVMM Servers C$ Share).
I made sure it verifies that it can connect to the install location before uninstalling the Agent. Because in case it can’t connect to SCVMM Server, I would rather have an old DHCP Agent, than no agent at all.
And finally, it’s uninstalling the old agent and installing the new one.
Done!

It’s also possible to use SCVMM’s Job function to schedule a job to be executed on all Hosts. But I’ll cover that in some future post.

Azure Pack: Add a new user to a plan automatically

Update: It looks like SMA is not executing the script when a new Tenant is created, but rather when a subscription is added to the user.
Trying to get it confirmed from Microsoft if that is a bug that’s been introduced in one of the latest updates. See comments for more details.

Problem: When a new employee for TrueSec (our company) is logging into Azure Pack he has to be added to the “Tenants – TrueSec Employees” plan manually.

Solution: One way is to add a “signup code” to the plan and tell new employees to manually join the plan with that specific code. It could work, but does not feel like the most optimal solution.

The desired way would be if all new employees could be added to that plan automatically. Is that possible?
– Of course it is, with the help of SMA! Let me show one way to do this.

Pre-Requisits: Connection Asset, SMA Runbook, Link Runbook to a tasma_asset1sk.

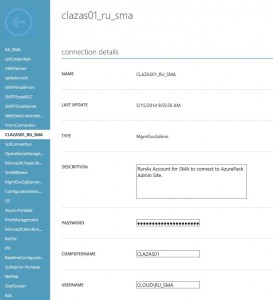
In my case, I’m using the MgmtSvcAdmin asset which looks like this. But you can also create other types of Connections with working credentials. Just notice that you have to enter the name of the Admin Site server in the Asset, as the script will use that info. And the useraccount specified obviously need access to use the Admin site (to modify the subscriptions).

Add a new Runbook with the script below. In my case, I’m using ADFS to connect to the Admin site, so the script has to generate a ADFS token first.
if you are not using ADFS, you will have to modify the script to use a normal Windows authentication. It’s the most common way to authenticate, so there shouldn’t be any problems finding example code for.

Though, please note that the script is currently matching the new users e-mail address to (in our case) @truesec.com or @truesec.se. If you don’t use ADFS, it’s possible for a user to type any name they want during registration and then possibly get added to a plan they should not have access too.

And finally, add a new Automation Task, you do that under Clouds -> Automation.
Object: SPF Tenant
Action: Create
Runbook: New-Tenant

The script:

I hope this helps you automating things in your environment. If you can think of any other great usages for SMA or have need for automating something. Please make a comment, maybe I’ll be able to assist.